
How To Topic 14 · AR Collision Builder
How to Build AR Collision Shapes in HxAR
AR Collision Builder lets a creator draw virtual interaction geometry around assets in an existing AR Experience scene. It is an advanced manual editor—not automatic object scanning, real-world obstacle detection or a certified measuring tool.
What this guide achieves
Open a suitable saved scene, create and edit the right collision shapes within the 1,000-point budget, and save only after understanding the current media-loss limitation.
- Topic
- 14
- Starting point
- A device-local AR Experience scene containing at least one saved USDZ asset and no saved media or specially styled Snooker table
- Guide time
- About 12 minutes
- Screen status
- Development feature guide
Quick walkthrough
Build AR collision geometry in twelve steps.
Protect the scene first, then choose, place, shape, lock, check and save the virtual geometry.
- 01
Use a suitable development scene
Do not edit a scene containing saved media or special Snooker table styling in the current build. Collision saving can omit those fields, including through autosave.
- 02
Open AR Experience
From the dashboard outer dial, open AR Experience, select Start your scene, use the scene controls and Open the saved local scene.
- 03
Enter Collision Builder
In the scene editor, select the orange outlined cube beneath Lighting AR. The Builder works on the opened scene and cannot create its base scene for you.
- 04
Read the point counter
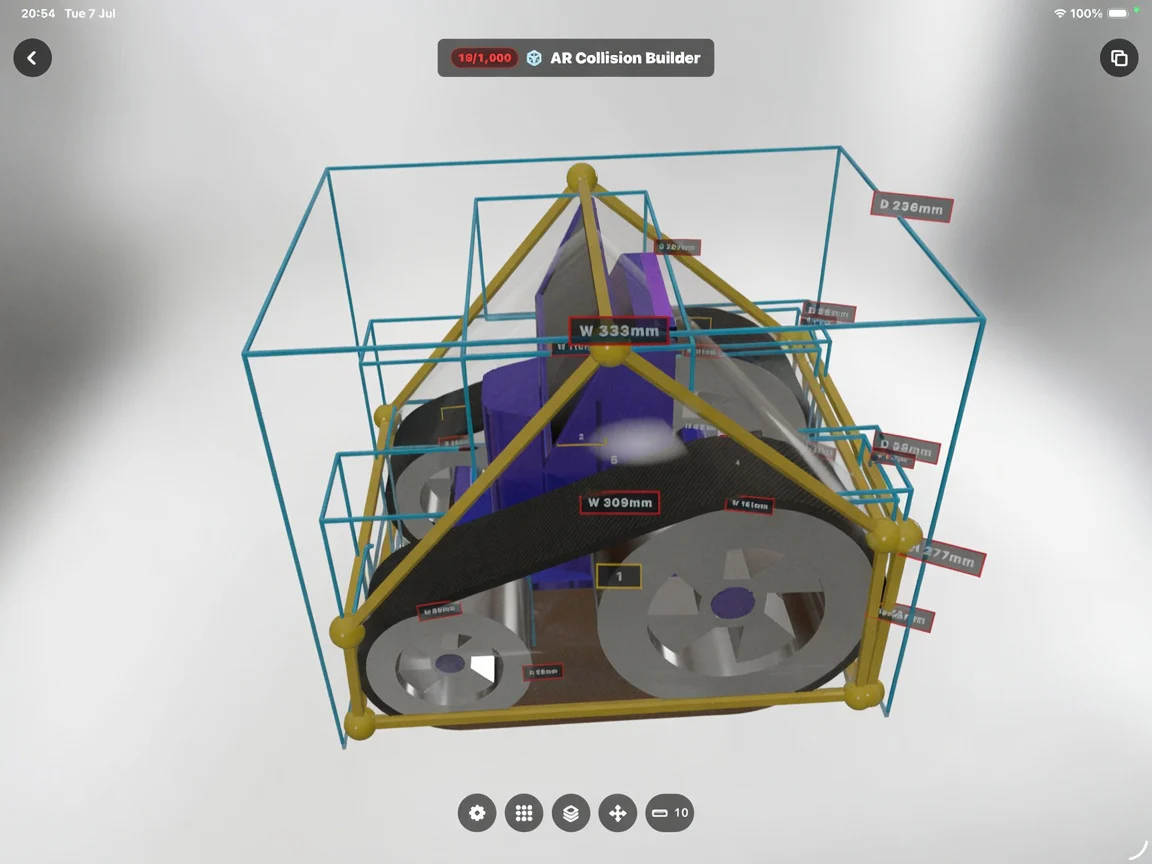
The top badge shows used collision points out of the 1,000-point scene limit. A 3D shape uses two points for every pair.
- 05
Choose the visible assets
Use the layers control when you need to show or hide scene assets while drawing. Visibility here helps editing; it does not delete the asset.
- 06
Add the right shape
Open the grid control and choose Point, Flat or 3D. Point uses one point, Flat offers 3–12 points and 3D offers 3–12 point pairs.
- 07
Place and select the collider
Add the shape in front of the camera, select it in the shape list and use the movement controls to position it around the intended virtual surface.
- 08
Edit points and dimensions
For Flat or 3D, choose a point or pair and move it. Grow or shrink by 10 percent, or adjust width, length and 3D depth within the displayed limits.
- 09
Adjust a Flat shape’s angle
Tilt a selected Flat collider backward or forward, or move it between lying flat and standing upright using the current turn step.
- 10
Lock the shape to an asset
Choose Lock and select a scene asset when the collider should follow that asset. Unlock it before positioning the geometry independently.
- 11
Inspect calculated distances
Use dimension and facing-face guidance as an AR editing aid only. Tracking drift and visual bounds mean these labels are not proof of a real clearance or physical size.
- 12
Save and test cautiously
Save the local scene, reopen it and test the intended interaction. Collider changes also autosave after about 0.8 seconds, so verify the scene immediately and keep original media and models elsewhere.
Read the current save warning before opening a valuable scene
In the reviewed HxAR 2.0 development build, Collision Builder rebuilds the saved scene with its assets, colliders and lights but does not preserve saved scene media or an asset’s special Snooker table style. Both the explicit Save control and the approximately 0.8-second collider autosave use that path.
Until the app is corrected, do not use Collision Builder on a scene containing media or special Snooker styling. Keep the original USDZ and media files somewhere you control. There is no unsaved-changes prompt or guaranteed exit-time save flush, so leaving immediately is not a recovery strategy.
This is a development limitation documented for safety and accuracy, not an intended AR Experience rule. Collision Builder does not charge Hexagon Tokens or HxElectrum.
Open an existing local scene before Collision Builder
From AR Experience, select Start your scene, open the scene controls at the upper right and select Open. Choose a device-local saved scene containing at least one USDZ asset. The cloud Story rows on the AR Experience hub are not scene-opening controls.
After the scene opens, select the orange outlined cube beneath Lighting AR. Collision Builder cannot create a new base scene and will show Open a scene before saving if no suitable scene is loaded.
The overlapping-squares control at the upper right opens scene controls. It does not duplicate the scene. Copy scene locations places technical scene details on the Apple clipboard; it also does not create a backup or copy of the scene.
Choose Point, Flat or 3D for the virtual surface
Open the grid control to add collision geometry. A Point collider uses one point with a radius from 5 to 500 millimetres. A Flat collider uses 3–12 editable points. A 3D collider uses 3–12 point pairs, so it consumes 6–24 points.
The total budget is 1,000 collision points across the scene. The screenshot’s 19/1,000 therefore means 19 points are in use; it does not mean that 19 complete collision shapes exist.
Use Point for a small radial interaction area, Flat for a plane or outline and 3D for a volume. These are creator-drawn virtual guides around an asset; the Builder does not automatically fit the model, scan the room or infer safe real-world boundaries.
Point
One collision point. Default radius is 10 mm; adjust in 5 mm steps between 5 and 500 mm.
Flat
A plane made from 3–12 points. Edit individual points, overall size, width, length and angle.
3D
A volume made from 3–12 paired points. Edit the pairs, overall size, width, length and a depth from 20 mm to 50 m.
Select the geometry before moving or resizing it
Select a collider row, then use the movement control to position it. Movement steps are 0.1, 1, 10, 25, 50 or 100 millimetres, with a matching turn increment. A smaller step is better for fine adjustment; a larger step moves through the scene more quickly.
For a Flat or 3D collider, enter point editing and cycle to the point—or point pair—you need. Move it with the arrow controls. Overall grow and shrink changes size by 10 percent; width and length use 1-metre steps and remain within the current 20-millimetre to 50-metre limits.
Flat geometry can tilt backward or forward and move between lying flat and standing upright. A 3D shape can shorten or stretch its depth. Inspect more than one viewing angle because a convincing outline from the front can be misplaced in depth.
Use asset locks and visibility without losing track of the scene
Lock a collider to an asset when its geometry should move with that object. The collider becomes relative to the selected asset. Unlock it before positioning it independently again.
The layers control limits which opened scene assets are visible while you work. It is an editing aid and does not remove a hidden asset from the saved scene. Select All moves the opened assets together; Custom movement currently reports Custom movement later and is not a finished route.
Long-pressing a collider row reveals extra placement and deletion controls. Collider deletion happens immediately without confirmation or undo, so confirm the selected row first. The long-press is also difficult to discover and does not yet have an equivalent accessibility action.
Treat dimensions and facing-face distances as editing aids
The overlays can label calculated width, length and depth around loaded assets and collision geometry. A separate view can report distances between parallel, overlapping faces for Flat and 3D shapes.
These values come from AR scene coordinates, saved geometry and a model’s visual bounds. Camera tracking drift, model scale and the chosen points can all affect them. They are not a tape measure, survey, clearance certificate, engineering calculation or collision-safety guarantee.
If the overlay reports no facing faces, check that the shapes are Flat or 3D, parallel and actually overlap when viewed from the relevant direction.
Saving updates the local scene; it does not publish a cloud Story
Save writes the edited assets and collision shapes back into the same device-local AR Experience scene. Once a scene has been opened and a collider changes, the Builder can also autosave after approximately 0.8 seconds. Reopen the scene and check the result rather than assuming a quick exit cancelled the change.
The local scene list is limited to 40 entries in the reviewed implementation. It is stored on this installation, is not separated by HxAR account and is not cleared simply by signing out. Treat a shared device accordingly.
Collision Builder does not upload, publish or generate a QR. When a compatible scene is later staged and uploaded through AR Experience, its collider definitions can become part of that cloud Story. Use the parent guide for the separate upload and sharing process.
Test the interaction, not the real-world safety of the space
Work in a clear, well-lit area, move the device slowly and stop if tracking drifts. The camera view helps AR tracking but does not make Collision Builder an obstacle detector. The cyan boxes and yellow guides cannot protect a person from furniture, machinery, traffic, steps or other physical hazards.
If Save is unavailable, confirm that a local scene is open and contains an asset. If the point counter reaches 1,000, remove or simplify shapes before adding another. If a lock behaves unexpectedly, unlock the collider, reposition it and choose the intended asset again.
After saving, reopen the scene and test every intended virtual contact from more than one angle. Confirm that media and special styles are still present; if the scene contained either before entering this development tool, the current save defect may already have removed them.
Use the written controls because the spatial editor is not fully accessible yet
Several top-level controls have accessibility labels, but the tiny dimension labels, fixed-size panels, nested controls, hidden long-press actions and changing 3D state do not yet provide a complete VoiceOver journey. Status changes are not consistently announced.
The complete control meanings and numerical limits are repeated in this page so the screenshot is not the only source. Real-device testing is still required for VoiceOver, Larger Text, contrast, colour independence, switch access, reduced motion and nonvisual understanding of collider position.
Ask another person to verify the physical space when necessary, but do not ask them to stand inside the area being tested. Stop the AR session if either person becomes uncomfortable or loses awareness of the surroundings.
Guide path
Move through HxAR one topic at a time.
New topics will be linked back into earlier guides whenever one action leads naturally to another.
Helpful now