
How To Topic 31 · Build in the Metaverse
How to Use the HxAR 3D Design Studio
To reach HxAR 3D Design Studio for this workflow, first own a Micro Mapped Property or a larger mapped property. Open Building and choose Design a replacement. Studio starts from the mapped building so you can prepare its doorway and appearance, then send and place the replacement.
What this guide achieves
Use the iPad Studio tools to prepare an enterable mapped-building replacement, add its surface appearance and send the correct design for placement.
- Topic
- 31
- Starting point
- iPad with an owned mapped property open in Property Management → Building
- Guide time
- About 20 minutes
- Screen status
- HxAR 2.1 release guide
Quick walkthrough
Create a building replacement in the Studio.
Use the iPad Pen tools to make one ground-level door and a simple facade, then verify the design-and-placement workflow.
- 01
Open Studio from the property you own
In Property Management → Mapped Plots, open your Micro Mapped Property or larger mapped property. Under More controls, choose Building, wait for verification and choose Design a replacement. Studio opens with that building’s footprint, height and orientation. Check Building Measurements beforehand if needed.
- 02
Inspect the model and measurement tools
Begin in 3D Preview. Use the orientation cube to change your view and Measure info to inspect surfaces. Draw contains tools such as Line, Rectangle, Move, Measure and Trim. Check the active plane and grid readout before drawing. Dimensions use millimetres, with larger measurements also shown in metres where appropriate.
- 03
Add a drawing plane to a suitable wall
Select an exterior wall in 3D Preview and choose Add Plane on this face. Keep the plane on the wall for a first door, inspect its direction and confirm with the Add Plane checkmark. The attached drawing workspace opens, giving the door sketch a specific wall to belong to.
- 04
Draw and measure a ground-level door panel
Choose Rectangle and draw a closed rectangle where the entrance should be. Keep its bottom at ground level and give it walking clearance. A simple starting size is about 1,000 mm wide by 2,100 mm high. Use Measure to long-press an edge, lock an end and enter its length when needed. Choose Done when the attached drawing is ready.
- 05
Project the rectangle and make it a doorway
Select the wall again, open its SKETCH menu and choose Project for the attached drawing. Inspect the target and confirm using the Project checkmark. Select the resulting rectangular surface, then use the door icon labelled Make this surface a doorway into this building. Wait for the doorway state to appear. Drawing the rectangle and marking it as a doorway are two separate operations.
- 06
Apply materials and facade pictures
Select the surfaces you want to finish. Use the palette control for their colour and material, then apply the edit. Use Put a picture on this surface to choose a photograph from Photos. Check the result from several angles and repeat for other walls. Use Measure info to understand each wall’s proportions before choosing a facade image.
- 07
Finish the edits and send the design
Complete or cancel any active drawing, Add Plane, Project or surface operation. Open Save at the top right and select Send to Service. Wait while HxAR sends the design and any pictures. If it reports that the doorway is not walkable, return to the projected panel, check its size and ground position, activate its doorway state and send again.
- 08
Place the sent revision and check it in HxAR
Close Studio. Building opens again with Your designs; refresh if the new row takes a moment to appear. Check the sent time, doorway count and picture count, then select the new revision to stand it on the property. Visit it in the Metaverse, cross the doorway on foot, inspect the room and use Exit to return outside.
Understand the drawing and 3D controls
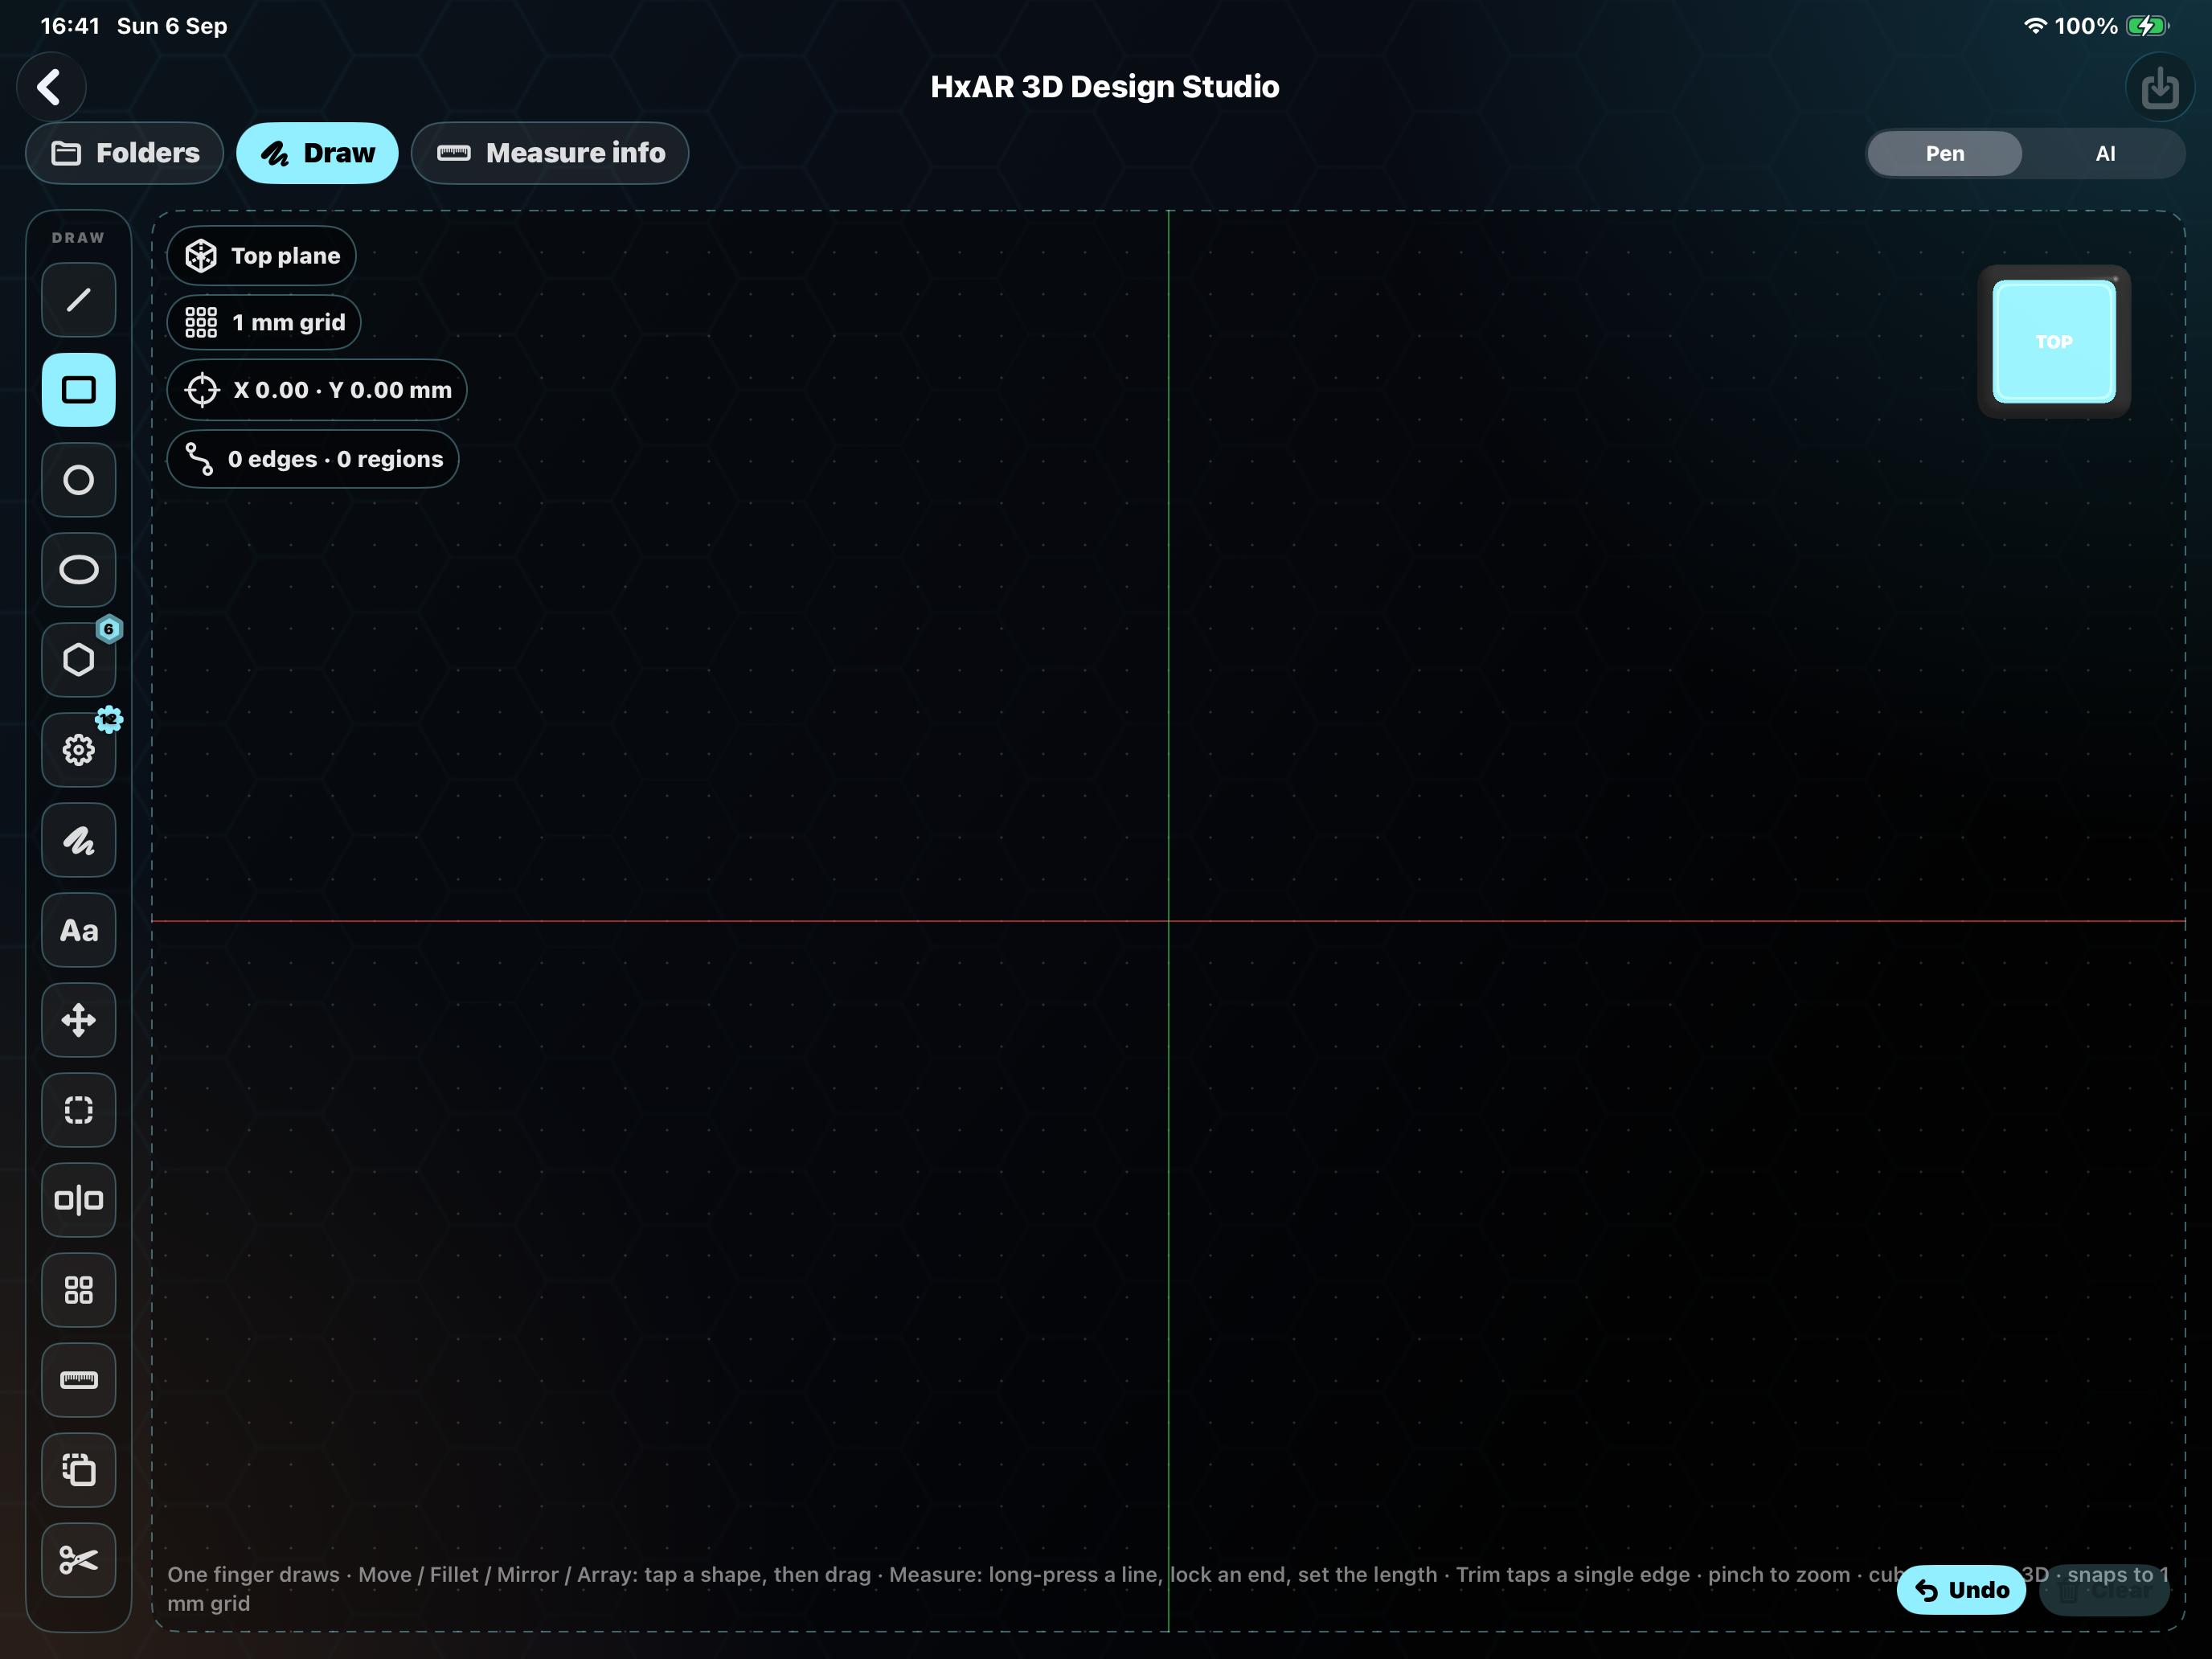
The screenshot shows the Pen workspace’s Top plane, grid spacing, coordinates and edge/region counts. In a replacement workflow, the building is already prepared. Preserve its shape while learning attached sketches and surface tools.
One finger draws and pinching adjusts zoom. The cube changes orientation and provides a route into 3D. A sketch edge, a body and a building surface offer different operations.
Draw and edit a sketch
Rectangle is useful for a first doorway; Line and Curve cover other outlines. Move adjusts existing shapes, Mirror reflects them, Array repeats them and Trim removes a selected edge segment. Use Undo for a recent change instead of clearing a sketch you still need.
Measure the right thing
Measure works on a sketch line and lets you set its length. Measure info reports the building’s surfaces and projected regions in 3D. Use both: one controls what you draw, while the other helps you check what the finished surface measures.
Work with surfaces deliberately
Select a face to see its available controls. Colour and material change appearance. Project creates surface regions from an attached drawing. The doorway control assigns entrance behaviour to an eligible projected region. A door photograph or a black material does not create that behaviour.
Make a doorway the avatar can actually enter
Use a rectangular projected panel on a wall, positioned at the building’s ground level. The current walking checks require at least 1.8 metres of height and more than 0.84 metres of width. A 1.0 by 2.1 metre opening is a practical first example. Keep the sill close to the ground rather than placing the panel high on the wall.
A roof opening, a window-height panel or a narrow decorative rectangle cannot serve as the required walking entrance. The Studio checks for a usable doorway before sending a mapped replacement. After placing the design, approach the saved doorway with the walking avatar to check the complete entrance flow.
Prepare facade pictures that fit the building
Measure info lists the surfaces so you can choose pictures with suitable proportions. HxAR fits a picture to its selected surface without stretching it, which can crop an image with a different aspect ratio. Inspect important details such as windows and signage after applying it.
A replacement started from Building copies the mapped shape. Add its pictures and doorway in Studio. When replacing an existing Studio building, review Keep pictures in Building; availability depends on compatible walls.
What Save, Folders, AI and Export currently do
Use Save → Send to Service for this workflow. It sends a design revision that can appear under Your designs in Building. Sending is not placement: you must return to Building and choose the sent revision. Check for completion before closing Studio, particularly when it is uploading pictures.
Finish active edits before sending
The Save control can be unavailable while a drawing, projection, picture or other edit is unfinished. Complete or cancel the operation and return to the settled model, then try Send to Service again.
Use the working iPad Pen route
This guide follows the iPad drawing tools shown in the screenshot. The AI panel currently says generation is coming soon. Do not depend on Generate shape to complete a building replacement.
Do not use Folders or Export as the completion step
The preview shows Folders and Export, but saving editable projects in Folders and exporting a model are not available parts of this workflow yet. Use Send to Service → Building → Your designs to place your replacement.
Guide path
Move through HxAR one topic at a time.
New topics will be linked back into earlier guides whenever one action leads naturally to another.
Helpful now