
How To Topic 18 · Drive Groups
How to Create and Test an HxAR Drive Group
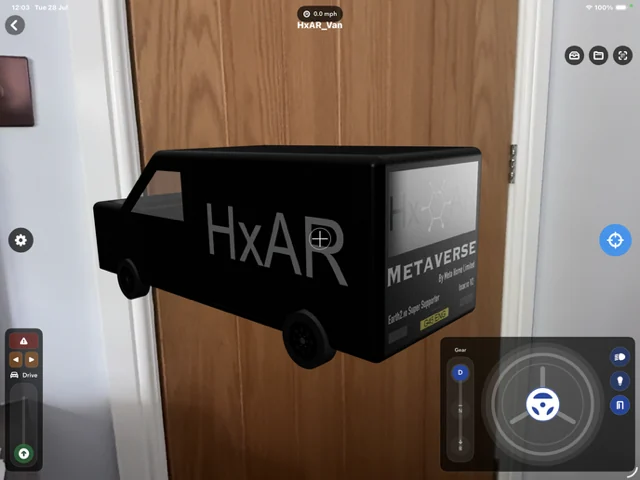
Drive Group turns selected Story assets into one virtual moving assembly. The editor supports Simple, Robot, Car and Bike setups plus optional door, motion and light classifications. Readiness is permissive, so a green state is not proof that the result drives correctly.
What this guide achieves
Build one coherent Drive Group, identify its front and moving parts, test its controls and understand which development options are stored but not yet fully implemented.
- Topic
- 18
- Starting point
- A staged AR Experience Story containing the separate 3D assets that should move together
- Guide time
- About 16 minutes
- Screen status
- Development feature guide
Quick walkthrough
Build and test a virtual Drive Group in fourteen steps.
Select the assembly first, choose its movement type and roles, then test the actual runtime rather than relying on the ready indicator.
- 01
Build the vehicle from separate assets
Add the body and any wheels, doors, moving parts or lights as separate scene assets where their roles need individual control.
- 02
Set The Stage
Arrange the complete opening assembly and save Set The Stage. Drive remains disabled until the Stage exists.
- 03
Open Drive
Select Animate, then Drive. The current editor and runtime effectively use one Drive Group, even though the saved format can contain an array.
- 04
Choose a drive type
Select Simple, Robot, Car or Bike to match the intended virtual controls and wheel-role choices.
- 05
Select group members
Add every asset that should move with the assembly. Do not add scenery or unrelated objects.
- 06
Identify the front
Choose the front asset and set its Forward Marker to Front, Back, Left or Right so the runtime knows the intended travel direction.
- 07
Assign wheels
Select wheel assets and choose roles appropriate to the drive type, such as car corners, bike front/back or robot left/right.
- 08
Review physics and grounding
Check the displayed gravity and collider summary. Colliders can help virtual grounding but do not provide general obstacle avoidance.
- 09
Configure doors
Use Door setup to choose supported roles, hinge side, hinge direction, opening angle and attached assets that should move with the door.
- 10
Classify optional motion parts
Motion can store Custom, Twist, Hinge, Extend, Slide or Suspension classifications, but the reviewed runtime does not yet consume them as animations.
- 11
Prepare vehicle lights
Create and tie lights in Lighting AR first, then assign supported purposes in Drive setup.
- 12
Save and open Story mode
Let the local Story save, then open the experience and inspect the controls for the selected drive type.
- 13
Test every implemented control
Test direction, steering, doors and supported light circuits. Confirm where the assembly stops and whether its final position persists.
- 14
Upload only after a shared-copy test
Reupload separately and test the downloaded Shared Story. A ready badge only confirms that a selected group asset still exists.
Choose the drive type that matches the virtual assembly
Simple, Robot, Car and Bike change the available roles and runtime controls. Select every asset that should travel with the group, then choose a clear front asset and whether its Front, Back, Left or Right points in the forward direction.
Car wheels can use corner roles; Bike uses front and back; Robot can use left and right sides. The exact model names do not create those relationships automatically—you must select the correct asset and role.
The saved Story format can hold several Drive Groups, but the current editor and runtime operate on the first one. Build and test one group rather than promising several independently drivable assemblies.
Drive readiness only confirms that one group asset still exists
The current share-ready check only confirms that one group asset ID still exists. It does not require a visible vehicle, wheels, a front marker, correct roles, colliders or working controls. A partial group can therefore satisfy upload readiness.
Open Story mode and drive the actual result. Check direction, scale, turning, grounding, every door, every light and the stopping position. Do not publish because a badge changed colour.
Drive movement does not include a general obstacle-collision resolver. Colliders are used for virtual contact and grounding, not to protect the user from real or virtual obstacles along the route.
Door and Motion setup contain development limitations
Door setup can record supported door roles, hinge side, hinge direction, opening angle and attached assets. Test both open and close. The Side door role currently reports ready but has no runtime movement.
Motion setup can store Custom, Twist, Hinge, Extend, Slide and Suspension classifications. No runtime consumer was found for those saved classifications, so the guide does not claim that they animate.
Treat both areas as development authoring data until the exact effect is visible in Story mode. Keep attached parts simple and re-test after renaming, deleting or replacing an asset.
Tie lights in Lighting AR before assigning vehicle purposes
A light must already exist in the saved scene and be tied to a Drive Group asset before it appears for purpose assignment. Supported runtime circuits include headlights and number-plate lights, interior lights, brake lights, reverse lights, indicators and hazards.
Exterior, Work, Ambulance and Police roles are stored but do not have dedicated runtime controls in the reviewed build. Never imply that a virtual emergency light grants road authority or represents a real vehicle signal.
A current upload identity defect can break an asset tie in a Shared Story. Preview every light in the downloaded shared copy before distributing its QR.
Understand the runtime speeds and check the final position
Simple, Robot and Bike provide forward, reverse, left, right and Stop controls with a live model-space speed from 0.5 to 20 mph. Car uses a steering wheel, accelerator and Drive, Neutral or Reverse with a 0.5–5 mph target. These numbers describe virtual AR movement, not real-world vehicle speed.
Some drive-state changes are not written back consistently. Non-car runtime speed changes are not saved into the group settings. A Car that coasts to rest can cancel without the asset-save callback used by Stop, while the Car interface has no Stop button.
After driving, leave and reopen the local Story to confirm the intended position. Treat unexpected movement or a lost final position as a development defect, not user error.
Reupload only after the local result is correct, then repeat the test in the Shared Story because upload does not happen automatically.
Drive Group moves virtual content—not a real vehicle
Use Drive Group while stationary in a clear, well-lit space. Never walk into traffic, operate a real vehicle or machinery, or rely on HxAR for navigation, obstacle detection or driving instruction.
Many setup buttons have accessibility labels, but the control panels use small fixed text and dense icon-only choices, and the spatial result still needs real-device VoiceOver, Larger Text, switch-control, contrast and motion testing.
No separate HxElectrum or Hexagon Token charge was found for Drive Group authoring in the reviewed build.
Guide path
Move through HxAR one topic at a time.
New topics will be linked back into earlier guides whenever one action leads naturally to another.
Helpful now