
How To Topic 40 · House services
How to Add Hot Water, Central Heating and Radiators in HxAR
Explore the hot-water and central-heating services inside your HxAR house. Add a cylinder and radiators, see how suitable radiator pipes connect to heating routes in the floor, and use Plumbing visibility to inspect what the finished surfaces normally hide.
What this guide achieves
Add radiators, understand their automatic pipe connections, and compare concealed plumbing with the revealed service view.
- Topic
- 40
- Starting point
- Inside a published HxAR house as its owner, with suitable room types and heating routes for the connections you want to make
- Guide time
- About 14 minutes
- Screen status
- Next app update preview
Quick walkthrough
Set up and inspect the services in ten steps.
Cylinder placement, radiator placement and pipe visibility have separate controls. Confirm each edit and check its save result.
- 01
Choose the interior tools
Enter House Interior as the owner. Open the list icon, select Items, Radiator and Plumbing visibility in Toolbar tools, then choose Done. Tools become available when you select a suitable floor position or wall.
- 02
Place or inspect the hot-water cylinder
For a new cylinder, use a Space or Room area, press and hold a clear floor position and open Items. Choose Megaflo cylinder, position and rotate its preview, then use Add cylinder and wait for the save result. Tap an existing cylinder to edit it.
- 03
Keep the water and heating circuits distinct
The cylinder has Hot water, Heating flow and Heating return routes. Its new-placement assembly provides starter heating pipework; the rest of the house still needs its routes. Select a pipe outlet or fitting to continue the appropriate circuit using the available pipe controls.
- 04
Place a radiator on a suitable wall
Tap a reachable interior wall, then choose Radiator. Drag the radiator preview along the wall and tap its width or height label to edit the size. Open the information button for Radiator specifications and choose a suitable type for the virtual room.
- 05
Add radiator valves and pipes
For a panel radiator, open Radiator valves and pipes. Choose the drain side, select TRV or standard for the opposite side, choose 10 mm or 15 mm pipes, then use Add valves and pipes. The towel radiator uses its own prepared valve arrangement.
- 06
Apply the radiator preview
Done in Radiator specifications closes that panel. Use the separate + beside the radiator to add it or apply changes. The main X cancels the placement preview. After +, the radiator change is in the current house session and still needs saving.
- 07
Check the automatic floor connections
When suitable heating pipes are nearby, HxAR can join the radiator’s free flow and return tails to matching routes in the same supported floor zone. Check both sides: proximity, circuit identity and clear space must all be suitable, so a connection is not guaranteed just by adding a radiator.
- 08
Reveal the concealed plumbing
Tap Plumbing visibility and allow the view to update. Routes can now be seen through finished walls and floors. Tap a revealed concealed pipe for its circuit, diameter and available depth information. Move through connecting rooms to inspect the next part.
- 09
Return to the finished-room view
Tap Plumbing visibility again to hide the reveal. The finished surfaces cover concealed pipes, while visible equipment and exposed parts remain part of the normal model. This hides the overlay without deleting or moving the plumbing.
- 10
Save the house and confirm
Use Save house after radiator and pipe changes. Wait for House saved or the saved checkmark. If a cylinder or another editor reports Save not confirmed, retry before leaving; use Stay if an exit save fails and you need to preserve the editing session.
Hot water and central heating use separate routes
The cylinder in the screenshots is the Megaflo item. Its Hot water route is separate from Heating flow and Heating return. The app also distinguishes Mains cold water. Similar-looking copper pipes are not necessarily on the same circuit; read the selected pipe’s information.
A new cylinder includes a starter heating assembly with valves and flow/return pipework. It does not automatically complete every route in the house. An older cylinder without that assembly may offer Add heating assembly in Position cylinder; use Done to keep the addition.
To add a cylinder, select Items after marking a clear floor position in a Space or Room area. Room type matters, not just its name. Position cylinder lets you tap the floor or hold and drag the model, rotate it and use fine-move controls. Read any fit or discharge-route refusal before choosing Add cylinder.
Tap the cylinder’s sizing plate to open Cylinder hot water. Edit hot-water demand and review the room assessments used for the boiler estimate, then choose Save to cylinder. The Heating and hot water choice describes the intended control arrangement for that estimate; it does not operate the valves.
Add a radiator and choose its specifications
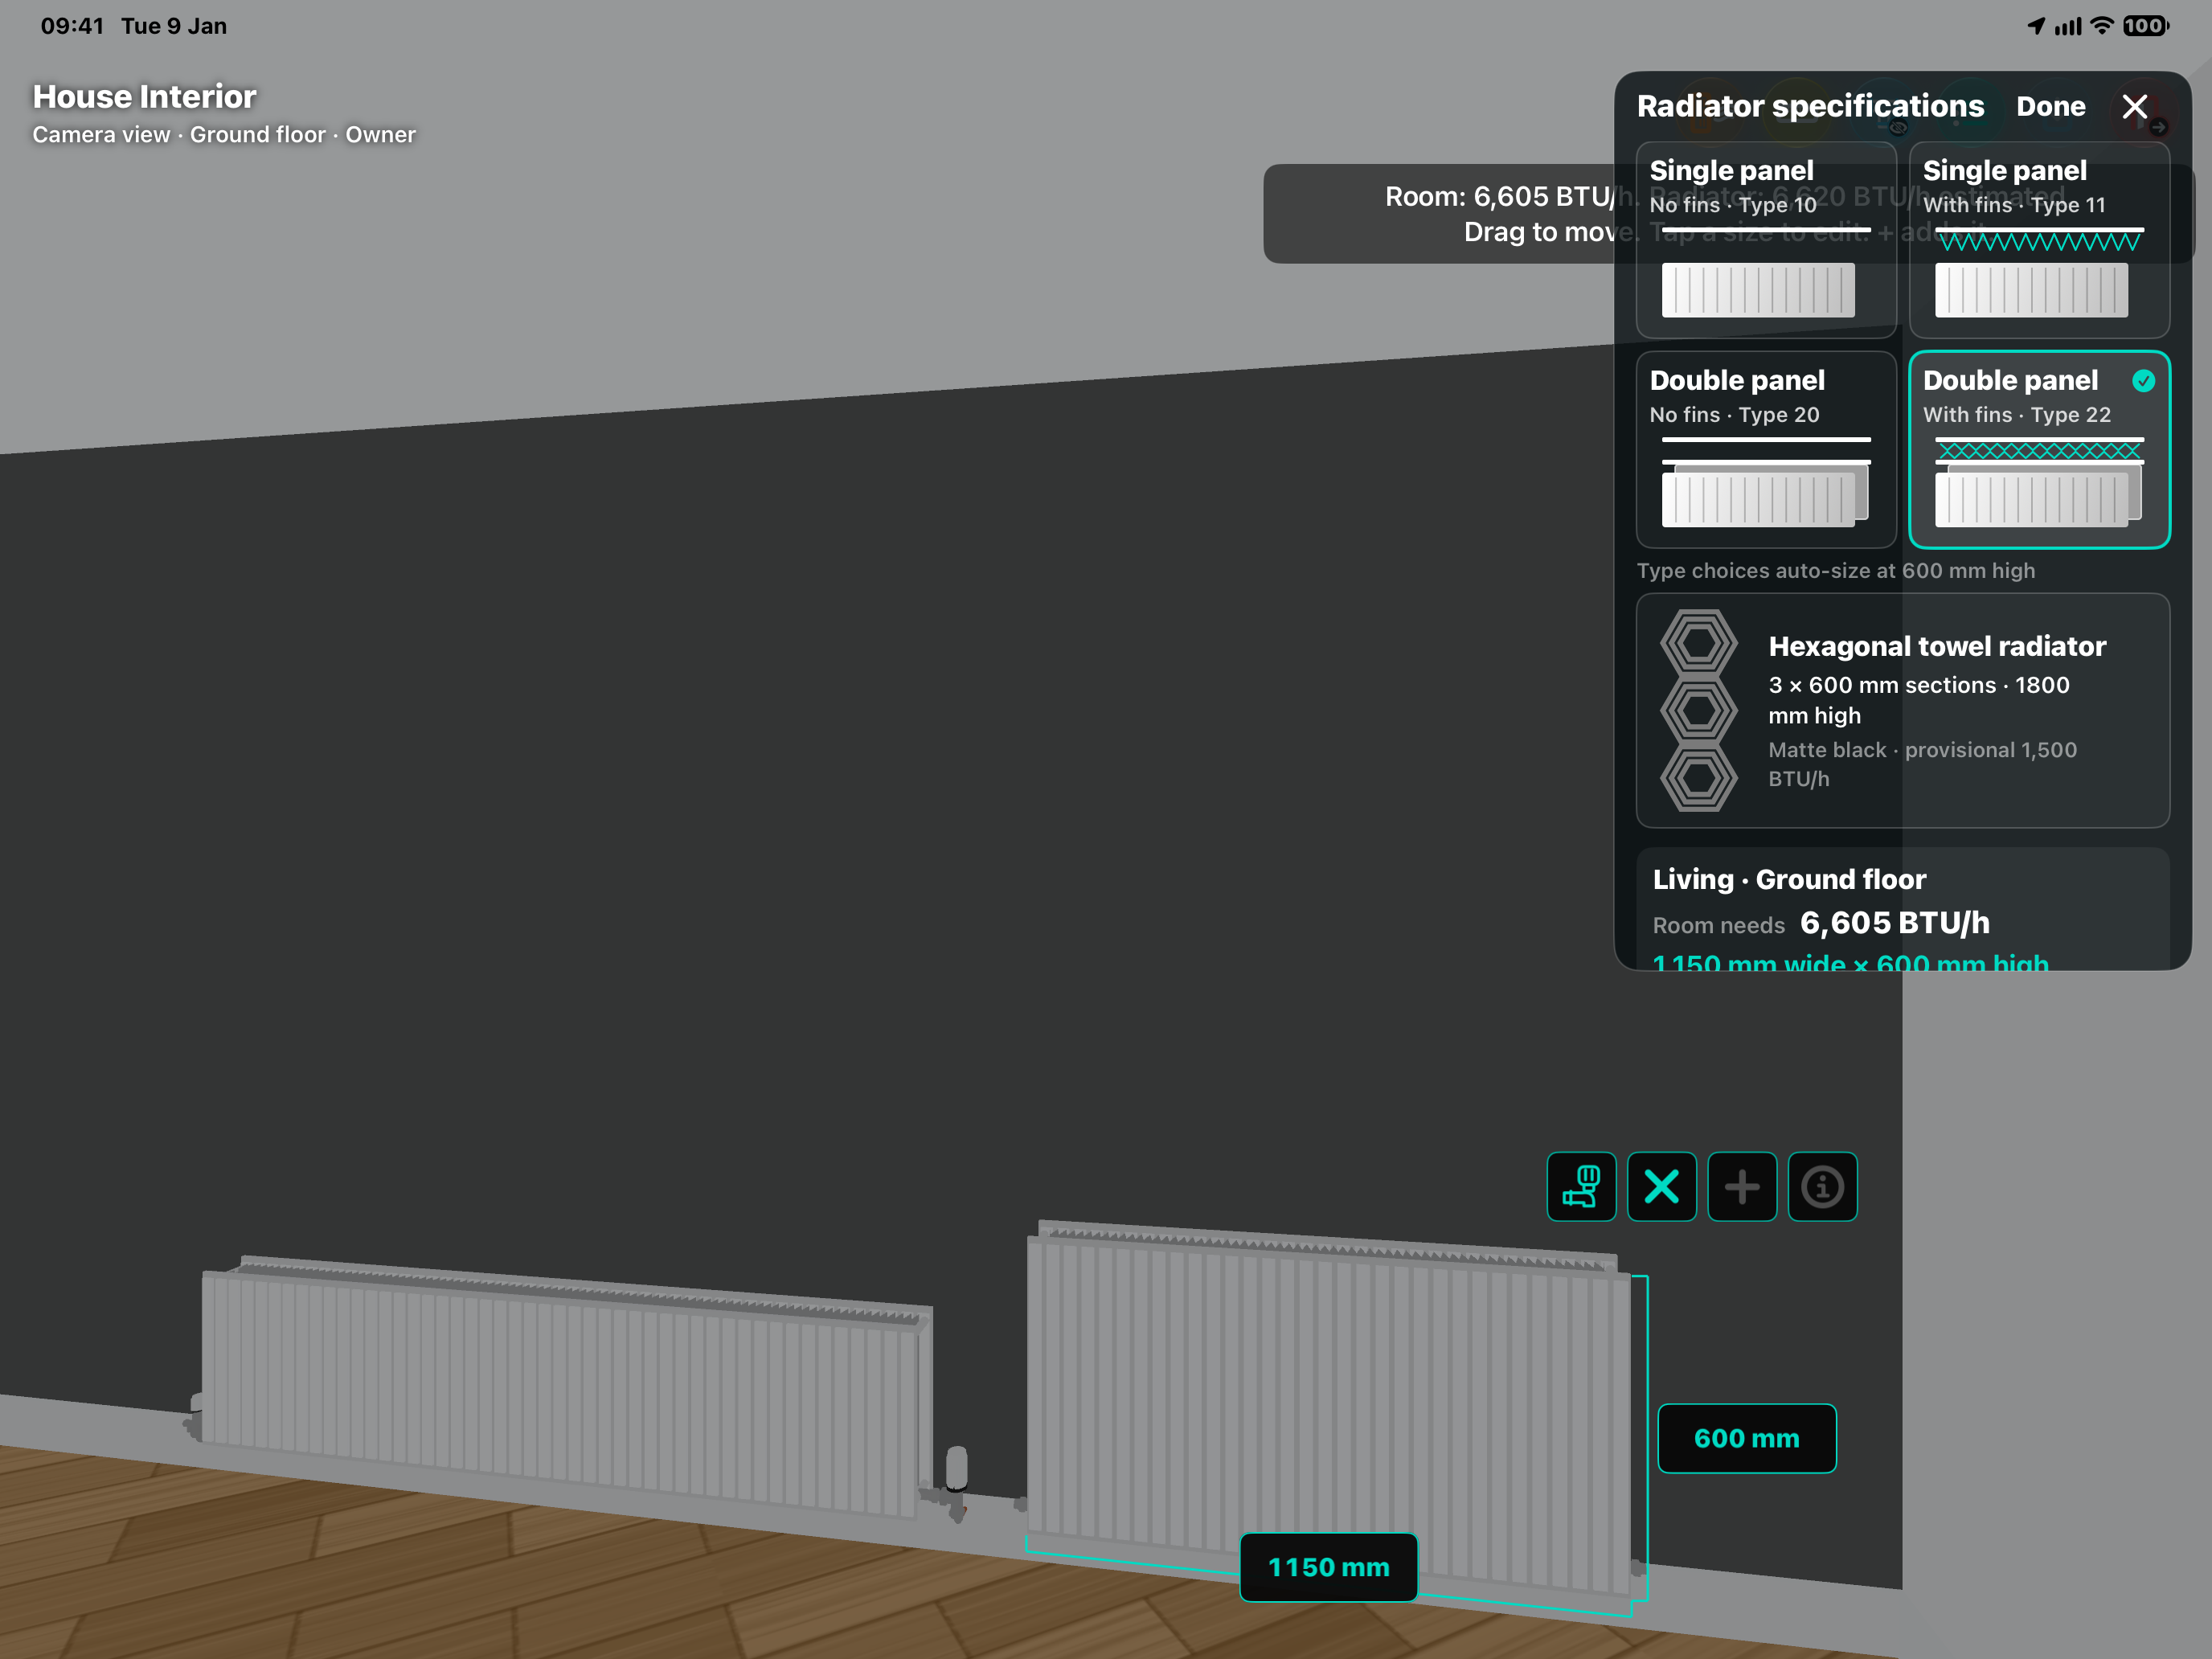
Choose Radiator in Toolbar tools, select a suitable wall inside the house and open the radiator tool. Drag the preview along the wall. Tap the width and height labels for dimensions, or use the information button to open Radiator specifications.
The four panel choices are Type 10, single panel without fins; Type 11, single panel with fins; Type 20, double panel without fins; and Type 22, double panel with fins. Choosing a type prepares a size at 600 mm high from the app’s room estimate. The hexagonal towel radiator is a separate choice with a provisional output.
Room needs shows estimated room heat demand, not the output of the selected radiator. The estimate uses room geometry and editable heating assumptions. The screenshot’s 6,605 BTU/h and 1,150 × 600 mm are values for that example, not fixed settings for every room. These are planning estimates for the virtual house.
Expand Room measurements and Heating settings where needed. Done in the specifications returns to the radiator preview. Use its separate + to apply the placement, then Save house. Tapping an existing radiator reopens its placement controls.
Add the valves that provide the radiator pipe connections
A bare panel radiator is not a complete heating connection. In its placement preview, open Radiator valves and pipes. Choose the drain side, then TRV or standard for the other side, then the pipe size for both valves. Add valves and pipes updates the preview; confirm with the separate + and save the house.
The hexagonal towel radiator uses paired standard 10 mm valves with left flow and right return. Its starter pipework is prepared with the towel option, so it does not follow the panel radiator’s valve wizard.
The starter pipes turn into the supporting wall. On the ground floor they rise towards the floor above; on an upper floor they drop into that floor. The route needs enough wall depth and space for its bends. Follow any refusal message if the wall or nearby objects prevent placement.
How the plumbing connects itself in the floor
When a radiator is placed or relevant heating pipework is edited, HxAR checks its free pipe tails for an automatic connection. Flow must meet a compatible flow route, and return must meet a compatible return route on a recognised heating circuit.
The current automatic join looks for suitable nearby pipework in the same upper-floor pipe zone, within 700 mm. It can join matching 22 mm heating mains or suitable 10 mm or 15 mm radiator routes. The candidate connection must also pass the app’s space and clearance checks.
This means the nearby heating route and radiator do not have to be created in one fixed order. It also means adding a radiator does not guarantee that both sides will connect. A ground-floor starter that has no usable upper floor is not a completed floor connection.
Reveal the plumbing to inspect the result. If a tail remains unconnected, check the circuit and floor, bring a compatible route within reach using the pipe editor, and read any placement refusal. Do not assume two crossing or touching-looking pipes have become the same circuit.
Already customised or connected radiator pipework can prevent a move, resize or style change. The app may require editing or disconnecting that pipework first. Check the message, make the intended adjustment and save the resulting house.
Compare hidden and revealed pipes in the walls and floors
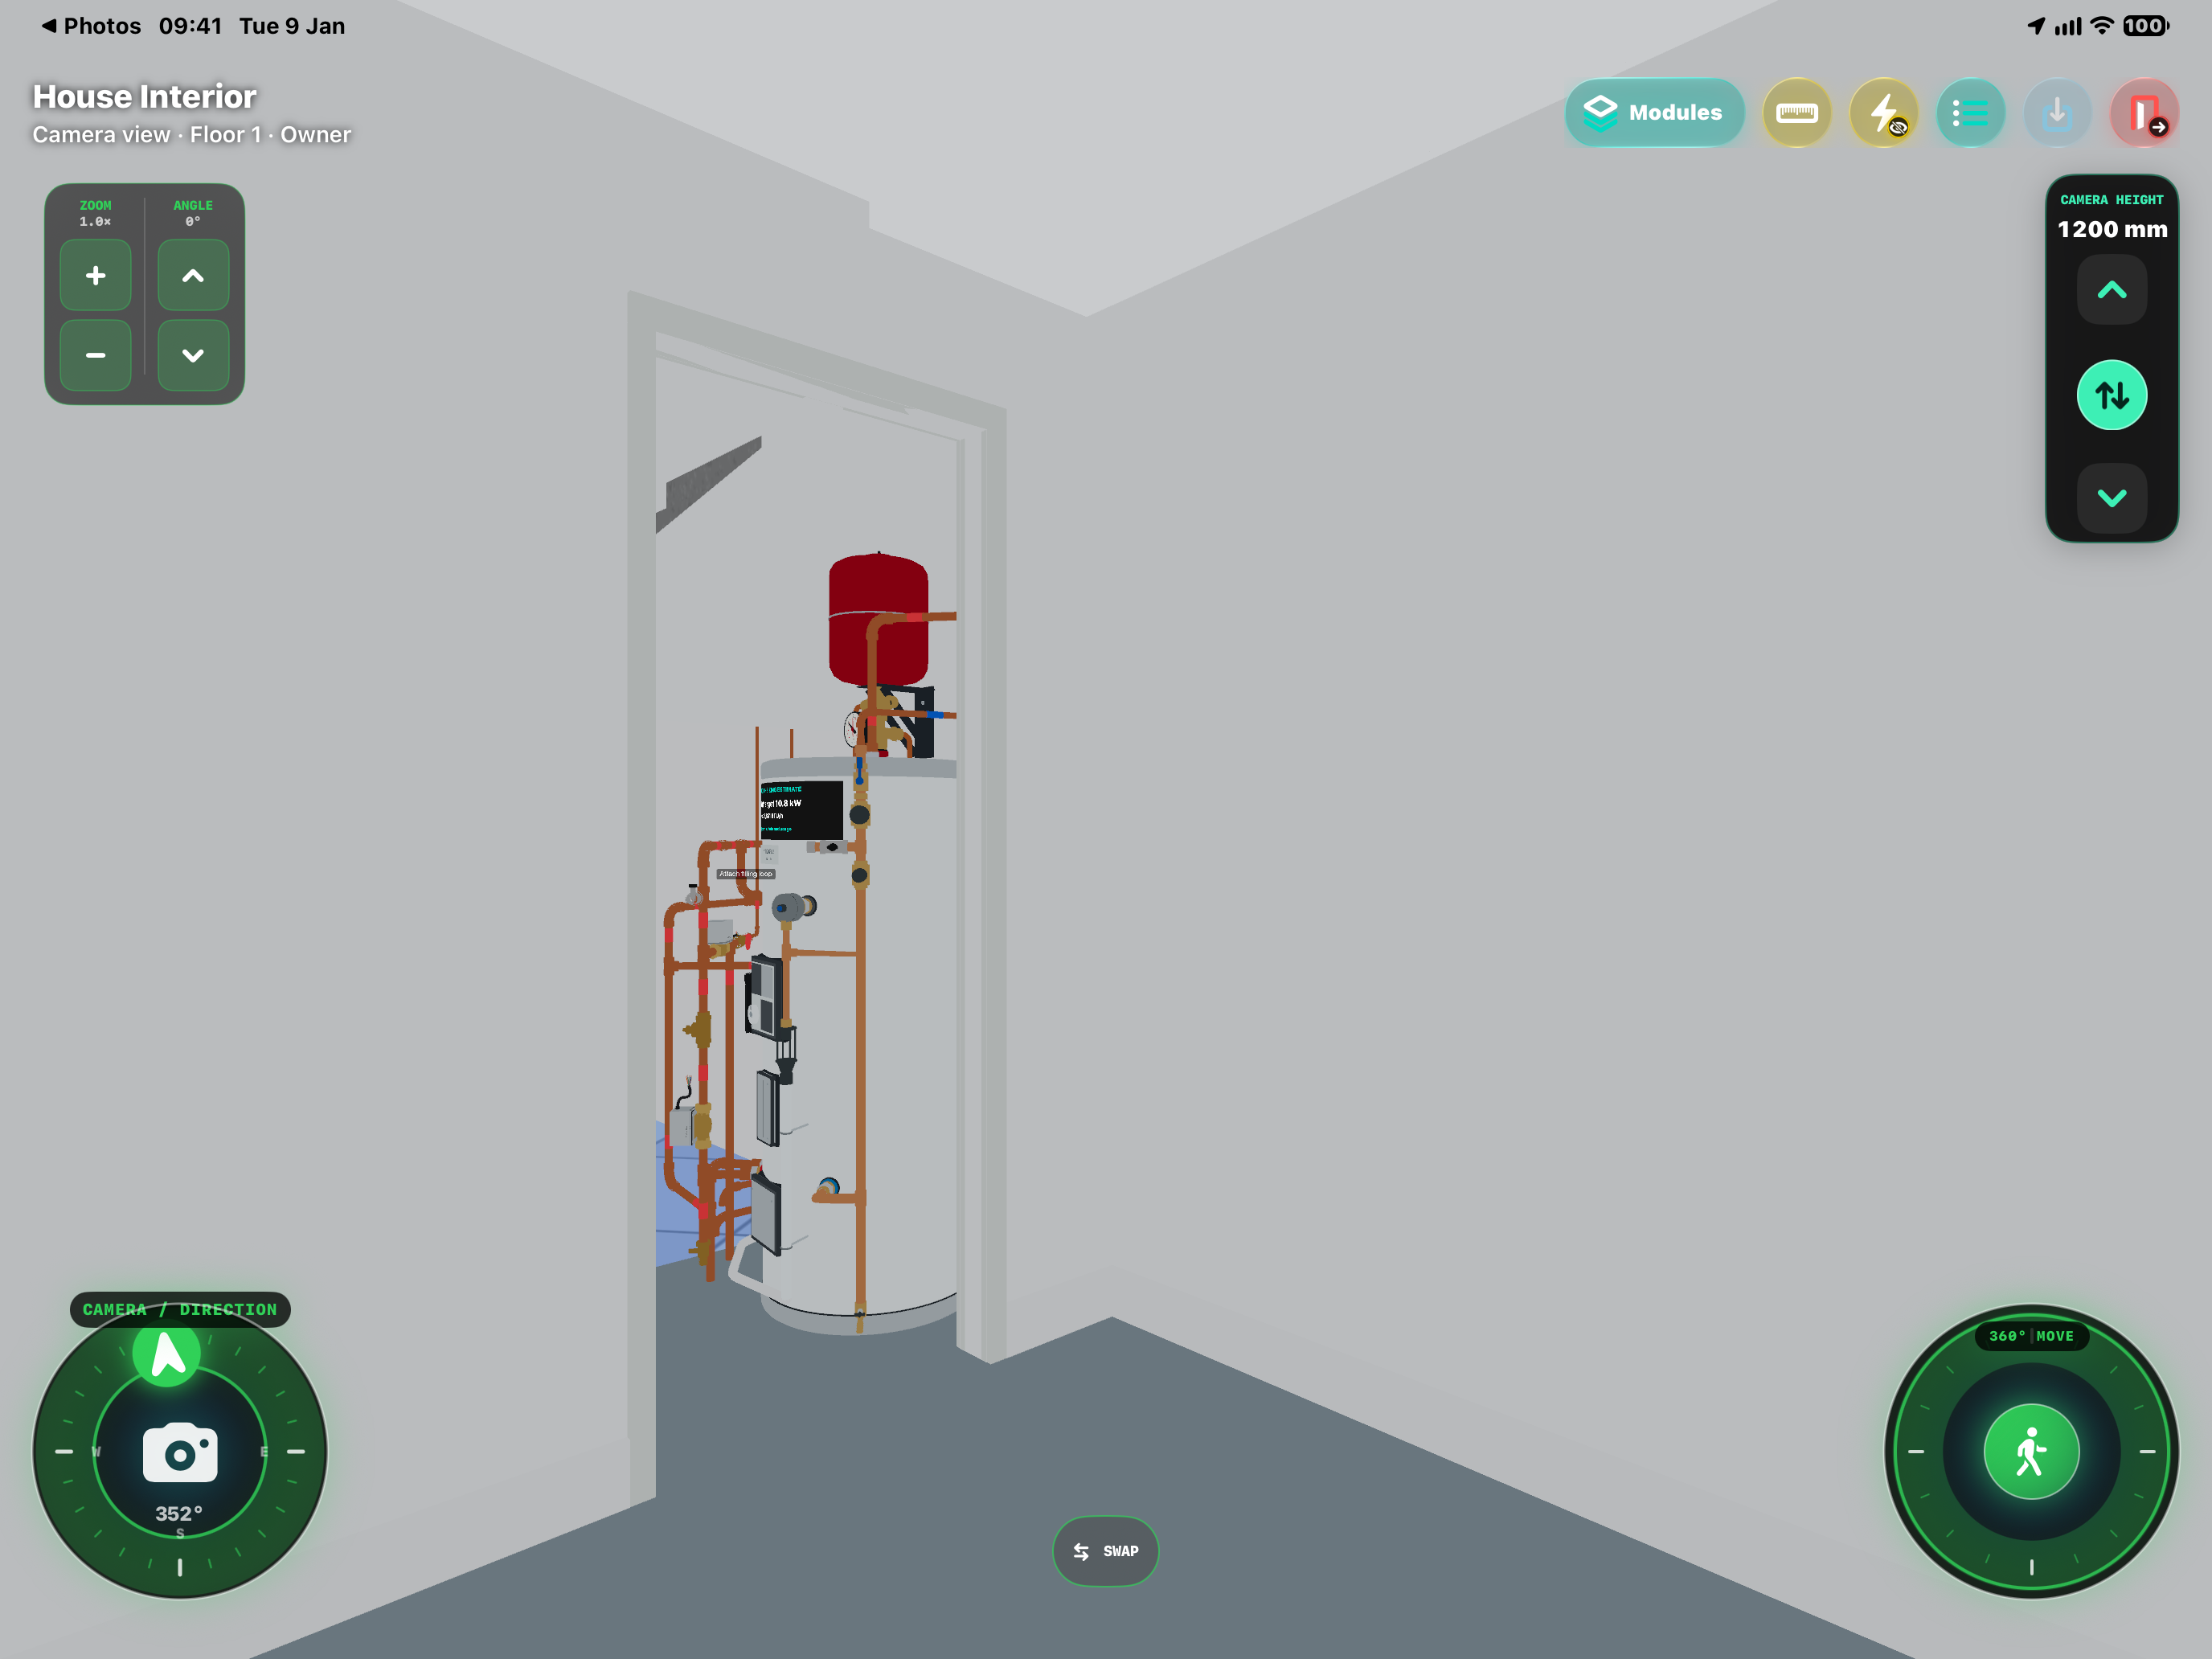
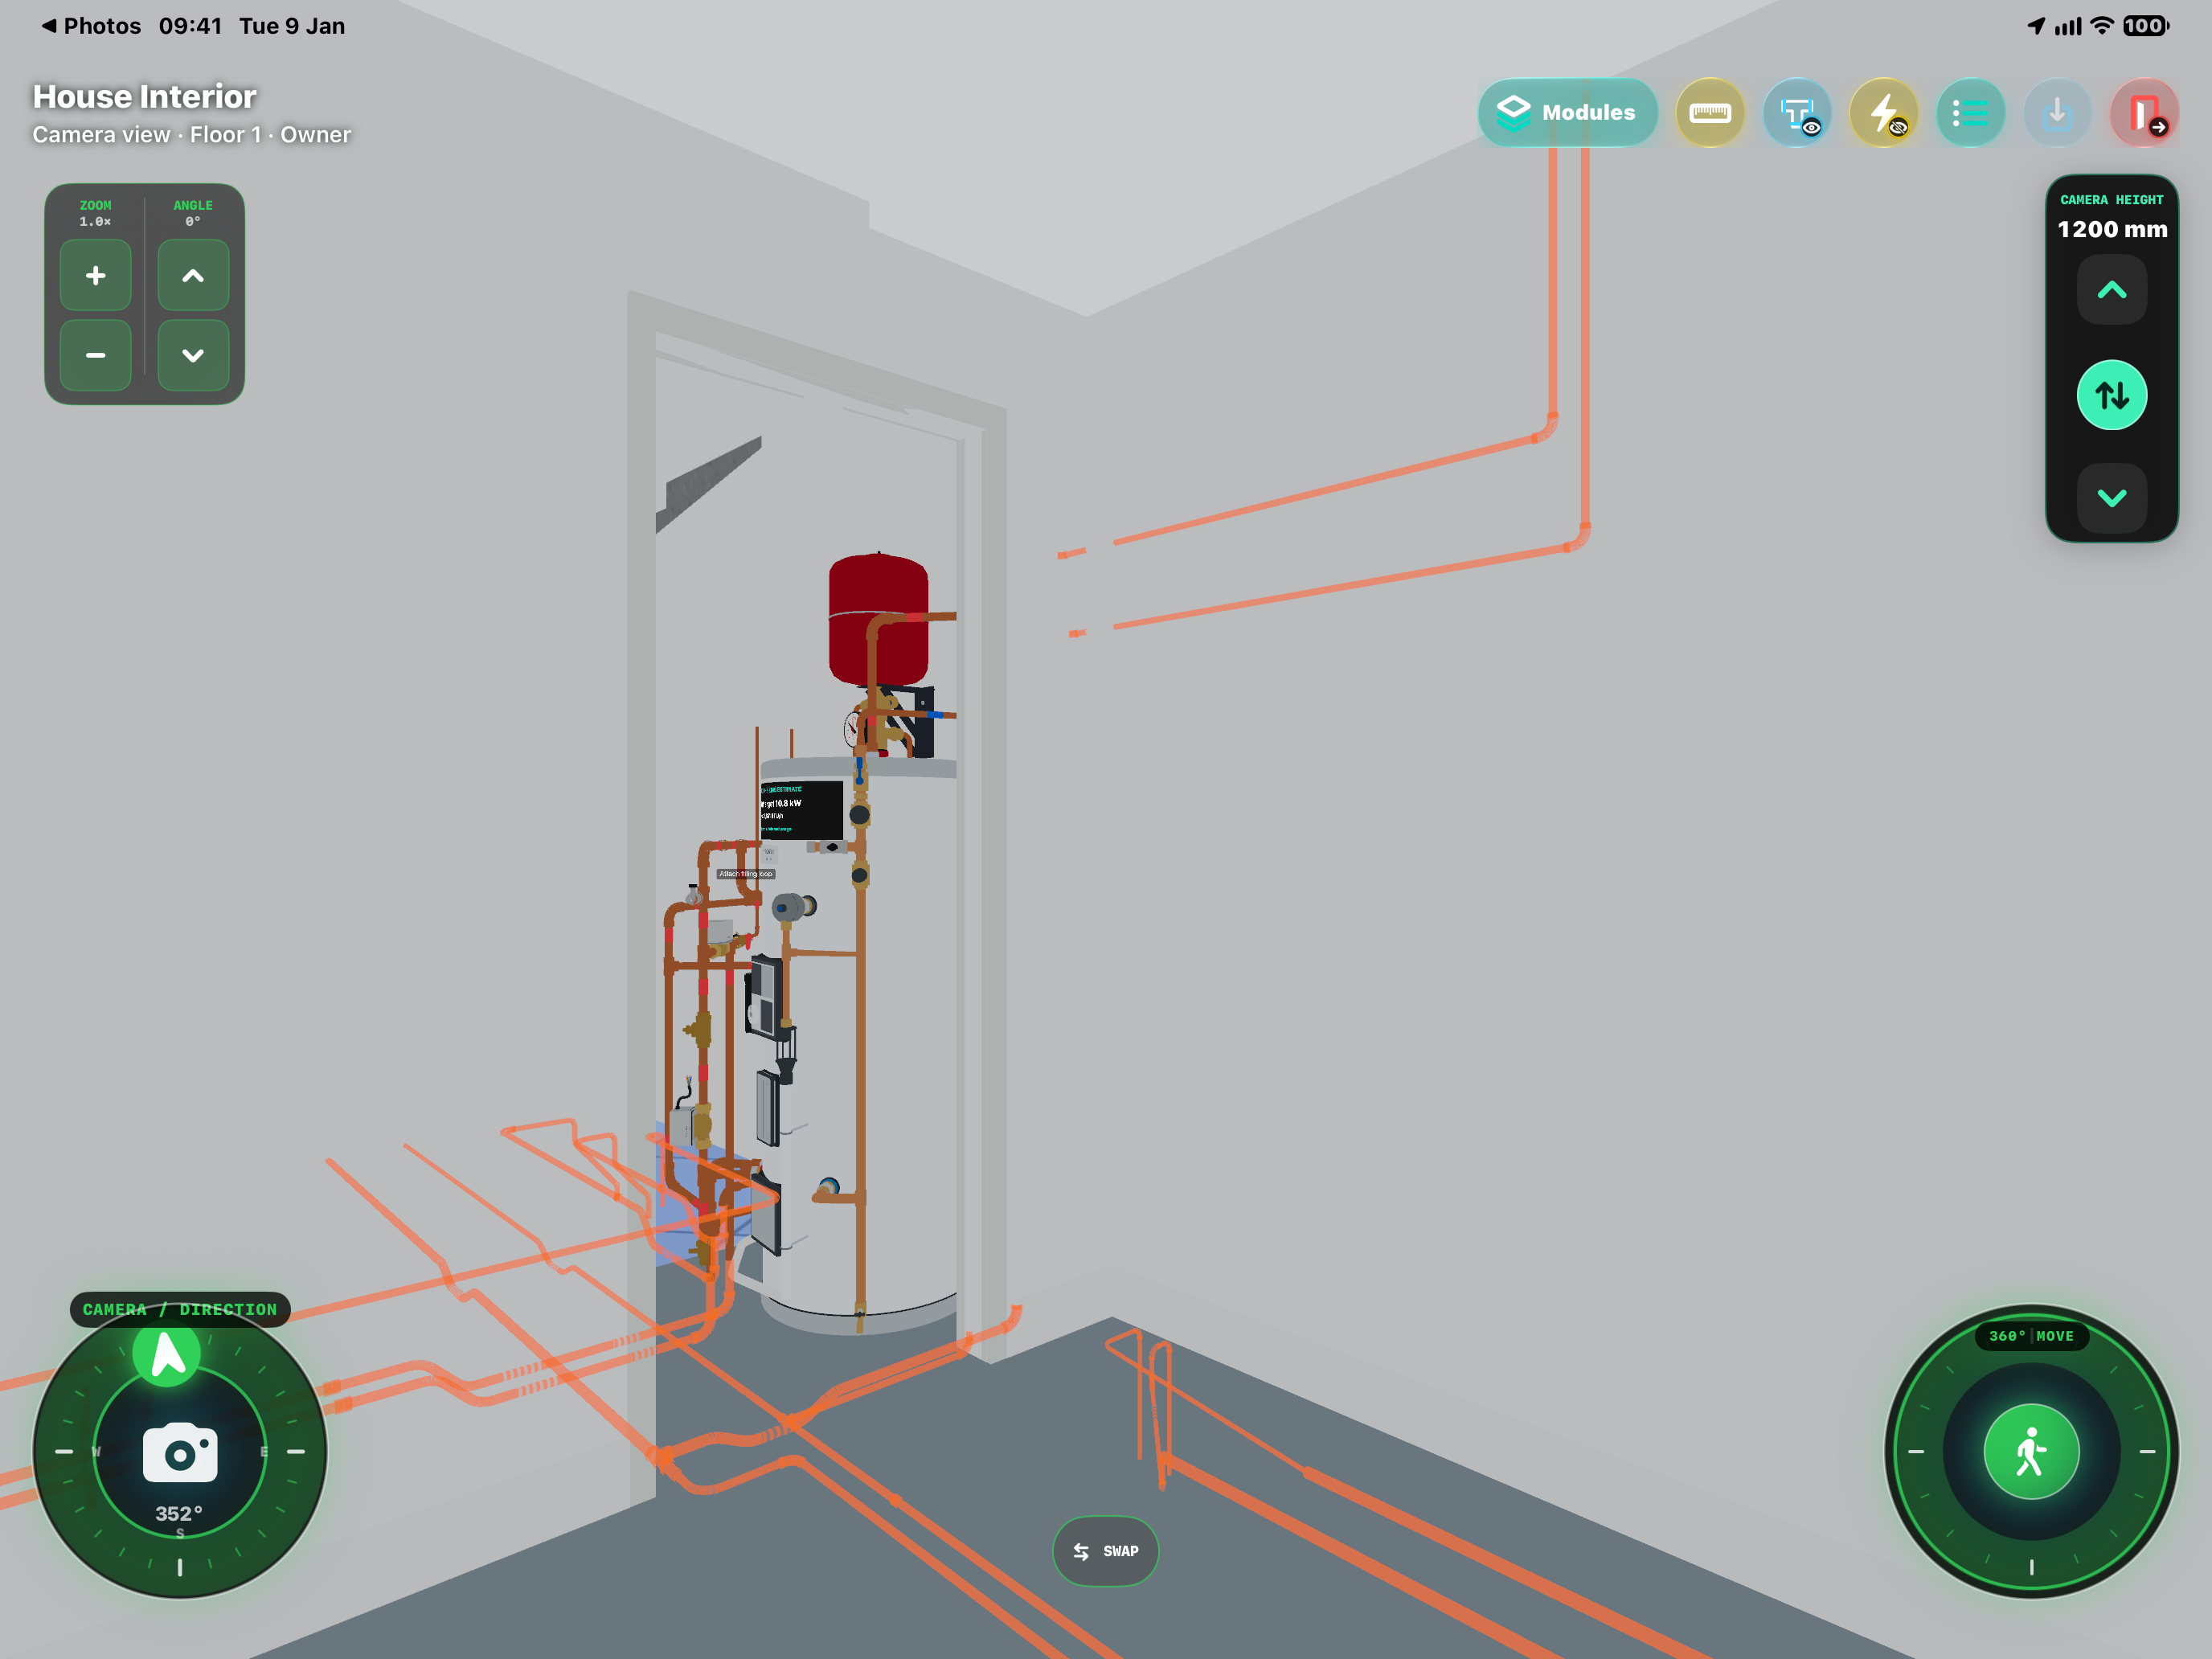
The opening image shows the normal interior: the cylinder assembly is visible through the doorway, but the finished wall and floor hide the concealed routes. The image below shows the same view with Plumbing visibility switched on.
Use the list icon to select Plumbing visibility for the toolbar, then tap its pipework icon. Shown reveals available gas and water services, including hot water and central heating. Tap it again for Hidden. Electricity visibility, shown by the lightning icon, is a separate mode; selecting electricity hides the plumbing reveal.
The reveal lets you inspect the saved routes without removing the wall or flooring. It does not change whether a pipe was modelled as exposed or concealed. Open connecting doors and move through the house to inspect services in the rooms available to your interior view.
Tap a revealed concealed segment to read its circuit, diameter and centre depth behind the wall or below the floor where available. Dashed sections indicate a pipe passing underneath another. Close the details with Done; an exposed fitting or endpoint may open its editing controls instead.
Save the result and check an incomplete connection
After the radiator’s + applies its preview, use Save house. Pipe edits also need a confirmed house save. Adding a cylinder and Save to cylinder attempt their own house save, so read their result before leaving.
Missing cylinder: select a Space or Room area in the room plan and mark a clear floor position before opening Items. Missing radiator tool: confirm ownership, select Radiator in Toolbar tools and tap a suitable wall.
No automatic join: check for a recognised heating flow/return circuit, the same upper-floor pipe zone, nearby compatible pipework and an unobstructed route. Inspect both radiator tails with Plumbing visibility; one successful join does not prove the other is connected.
Use Undo for an available edit, then save again if you want to keep the reverted state. Exit house attempts to save pending changes. If it fails, choose Stay to resolve the problem without abandoning your current session.
Guide path
Move through HxAR one topic at a time.
New topics will be linked back into earlier guides whenever one action leads naturally to another.
Helpful now