
How To Topic 37 · House Plan
How to Create a House in HxAR with House Plan
House Plan takes you from a group of virtual HexTiles to a house you can visit in the HxAR Metaverse. Start with your land, draw the outline, build the shell and arrange the rooms. Your drawing stays a local draft until you choose to place the building in the shared world.
What this guide achieves
Turn grouped Property Land into a house, save its plan and choose when to share it in the Metaverse.
- Topic
- 37
- Starting point
- HxAR dashboard → House Plan, on iPad with Apple Pencil and eligible owned Property Land
- Guide time
- About 16 minutes
- Screen status
- Next app update preview
Quick walkthrough
Create your first house in twelve steps.
Start with a simple outline and one ground floor. Add upper floors and an attic when you need them, then check the doors and publish only when the plan is ready.
- 01
Open House Plan
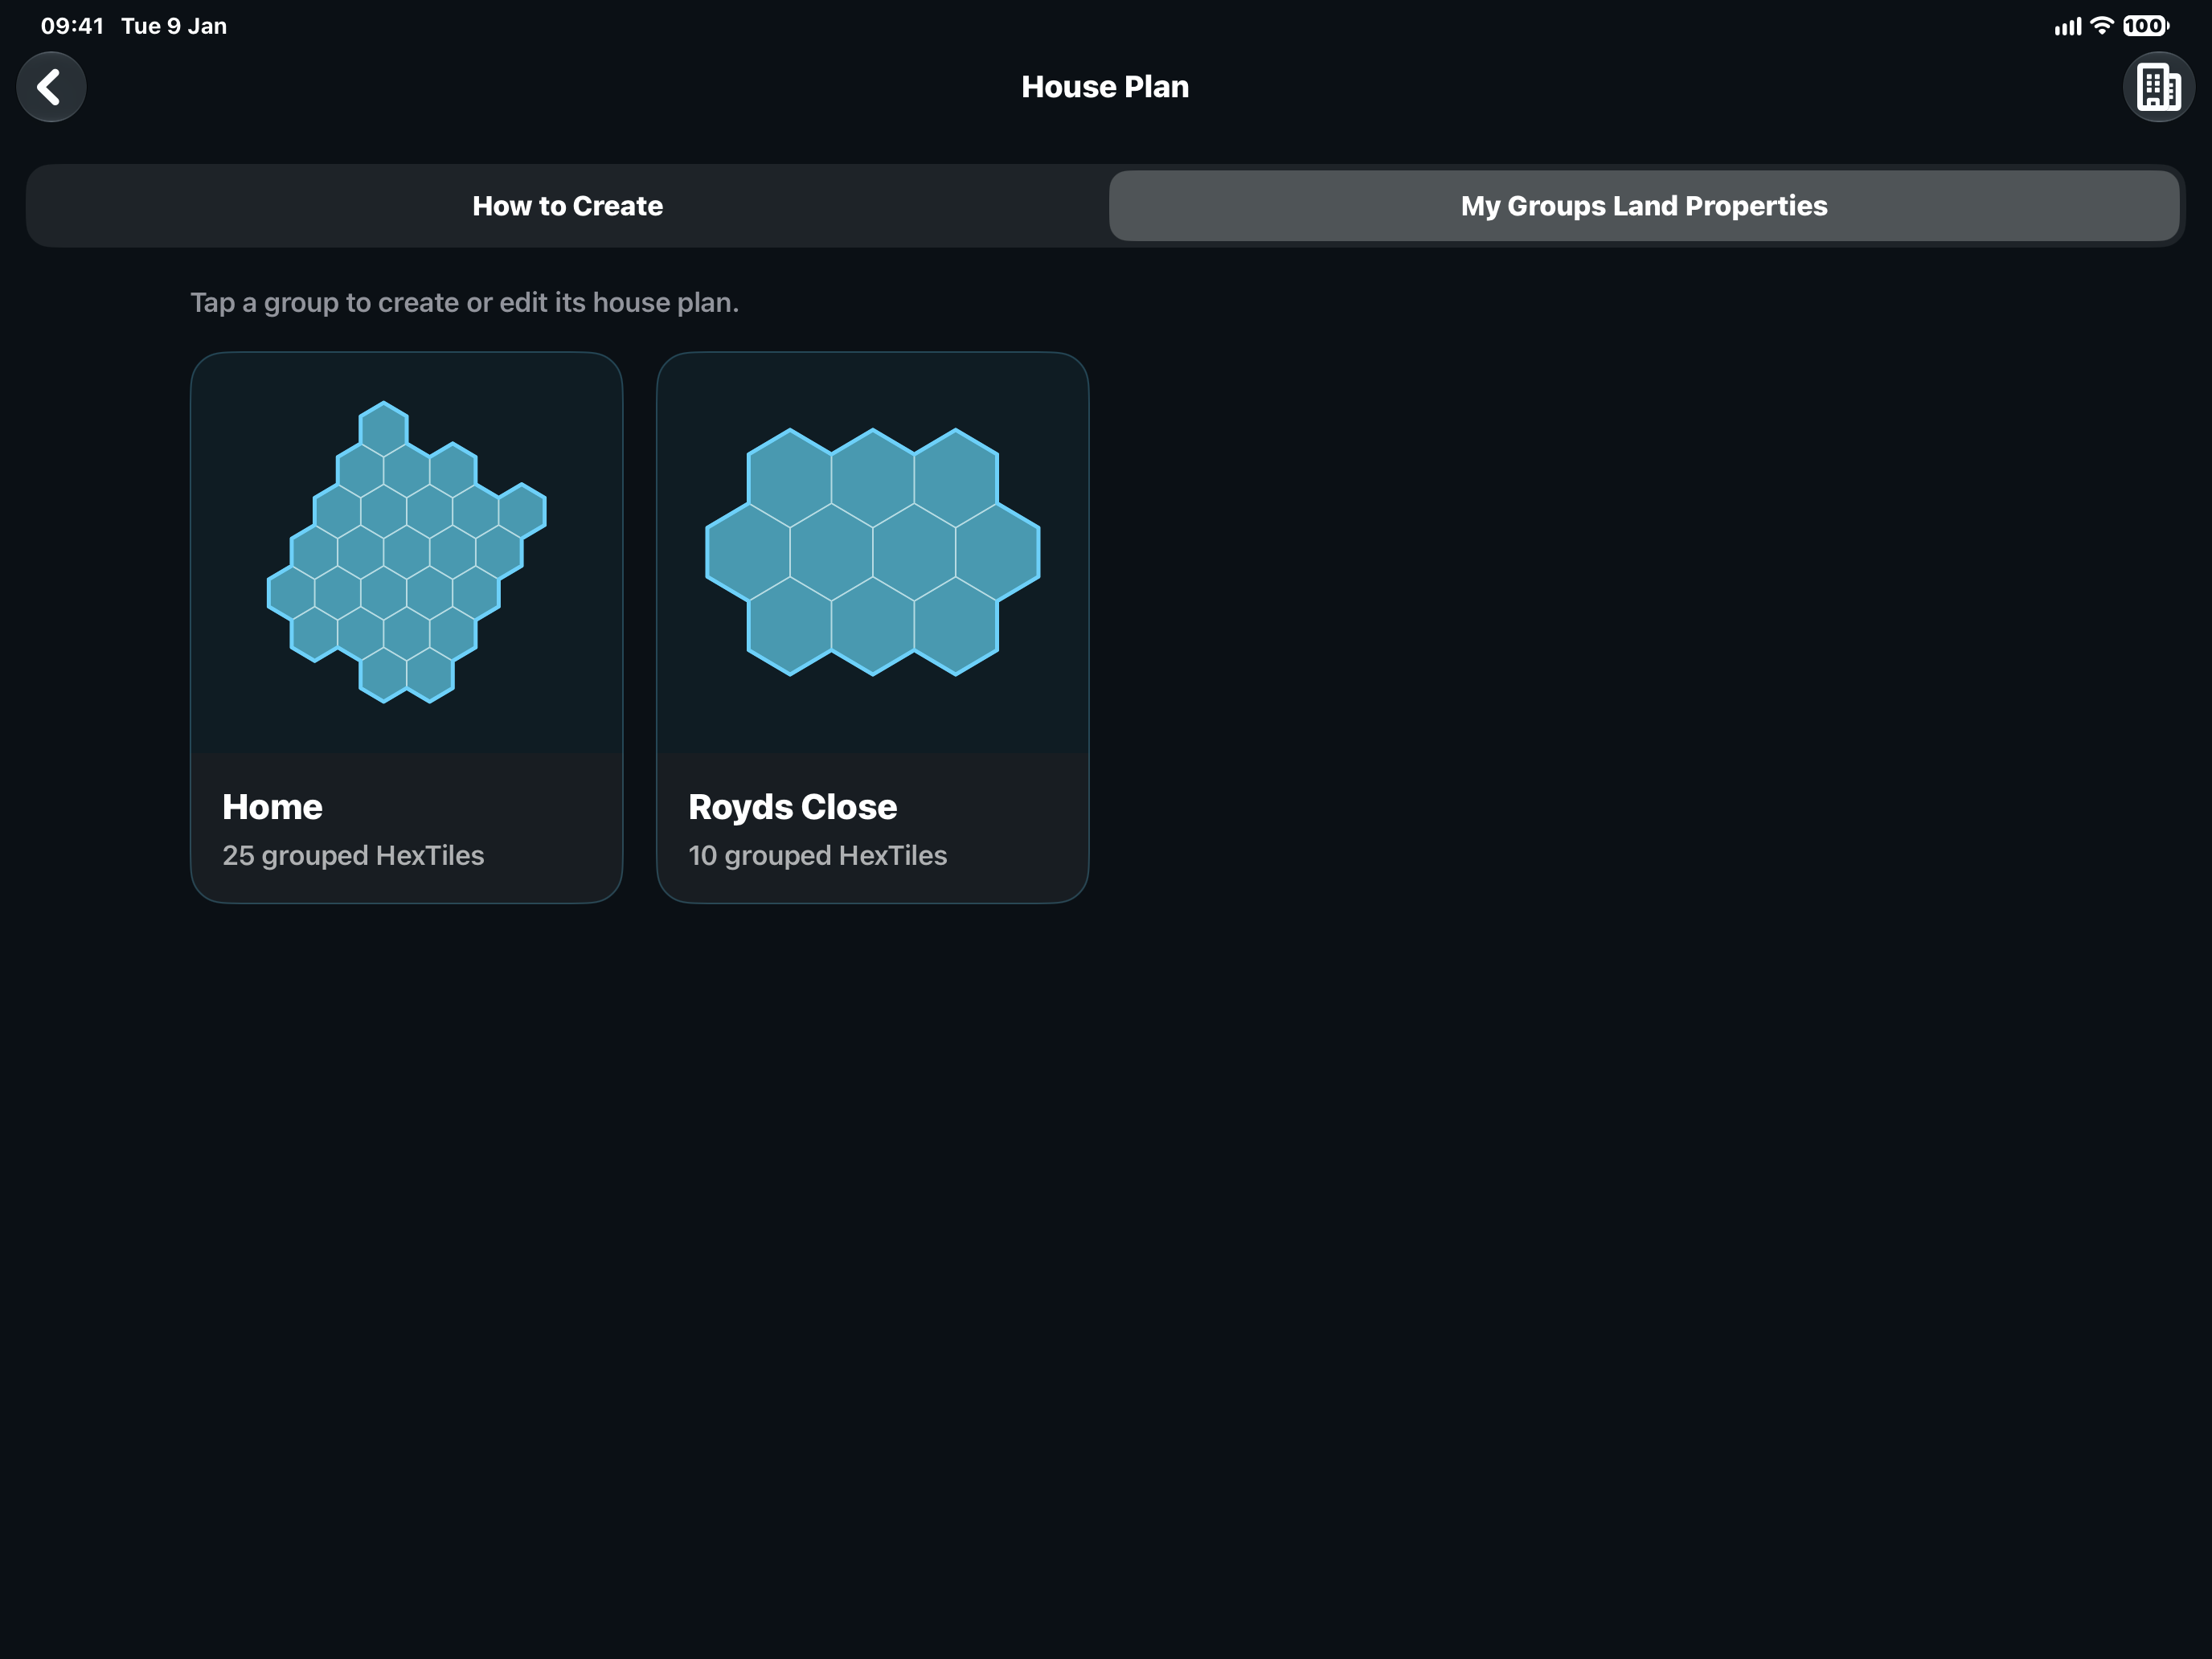
Tap House Plan on the dashboard dial. If it is missing, tap an empty + slot and add the House Plan shortcut. Open How to Create for the in-app demonstration, or My Groups Land Properties for your own groups.
- 02
Prepare adjoining Property Land
Use actively owned HexTiles that share edges. Set every tile to Property Land before grouping. In Property Management, choose Group, select the tiles, give the group a name and review the displayed cost before confirming the merge.
- 03
Open your group’s plan
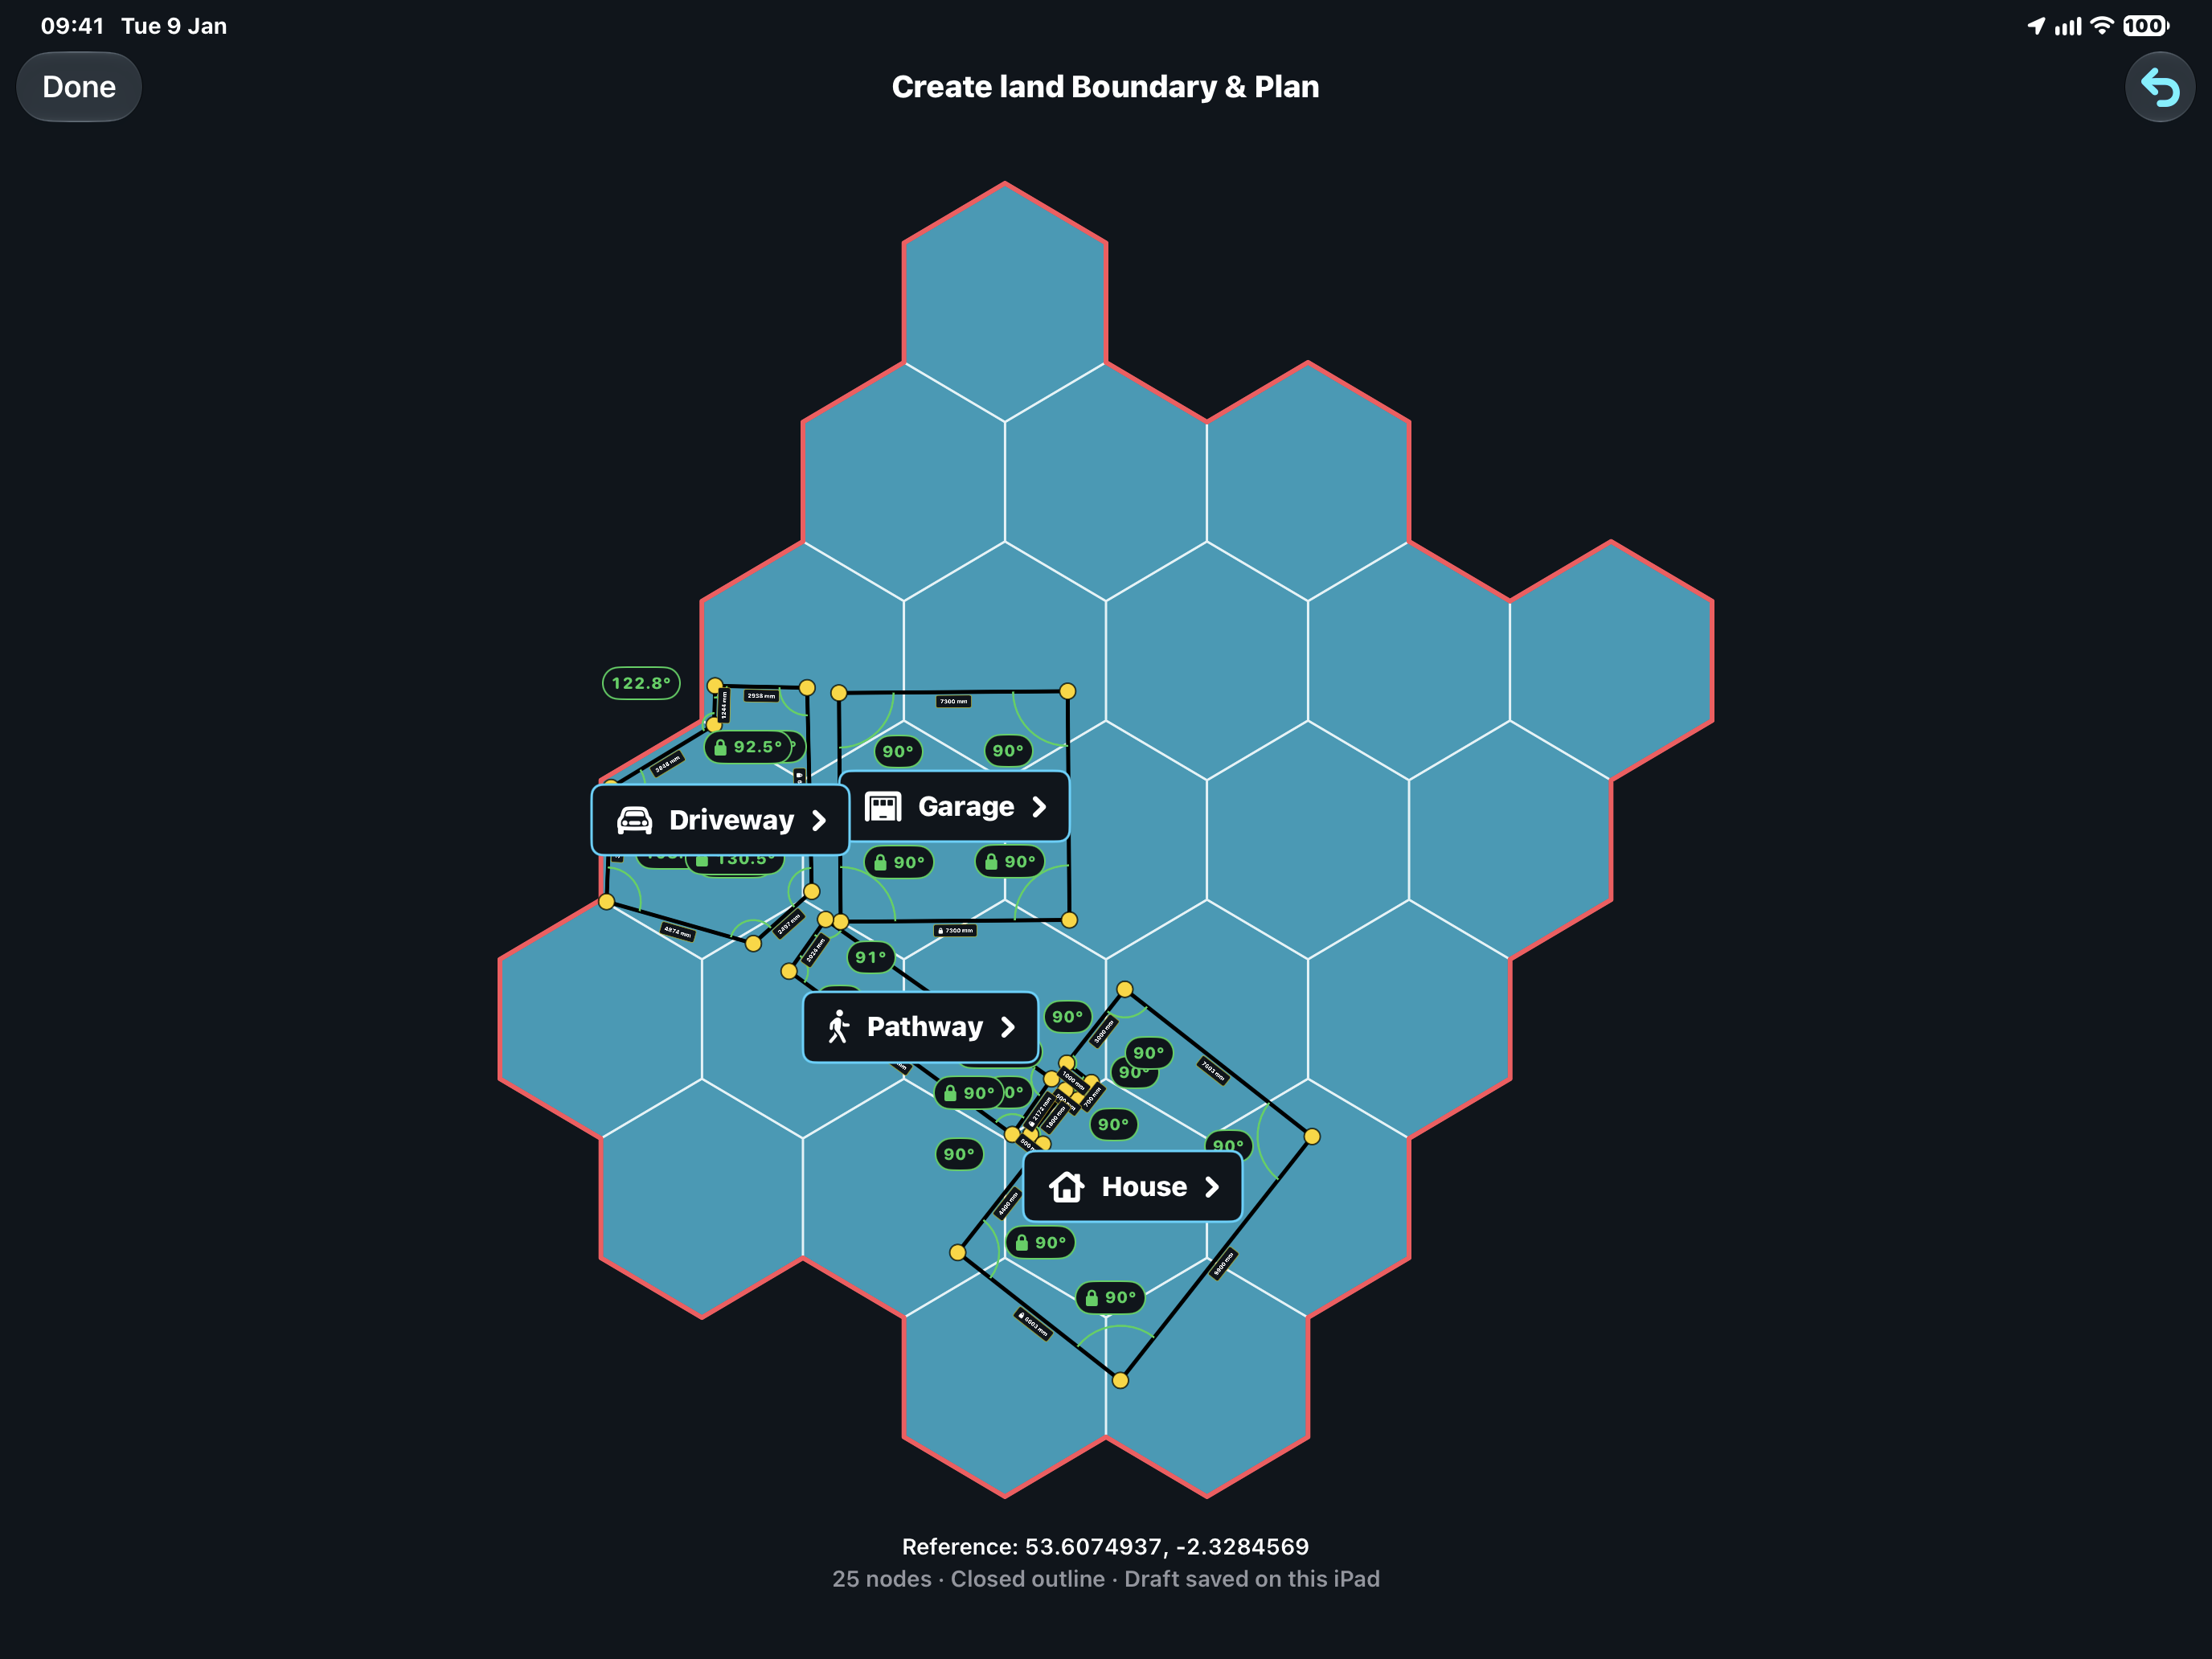
Return to House Plan → My Groups Land Properties and tap the group card. Create land Boundary & Plan opens with the group’s HexTiles and red outer boundary.
- 04
Draw the first outline
Use Apple Pencil to place a point inside the land, then drag from that point to make a line. Continue from each endpoint to add corners. Pan with a finger and pinch to zoom.
- 05
Check measurements and close the shape
Tap editable length or angle labels to adjust the outline. Keep every edge inside the group and avoid crossed lines. Draw the last line back to the first point, then choose House when What are you creating? appears.
- 06
Create the walls
Open the House controls, review Wall thickness and adjust the cavity if needed. Choose Create to make the wall shell. If the walls do not fit, correct the outline or cavity before continuing.
- 07
Set the ground floor
Set Ground floor height using Floor to ceiling and Base below. Choose the section’s Done button to continue to Floors.
- 08
Choose upper floors and roof
In Floors, set the floor/ceiling thickness and upper-floor count and heights, then choose Done. Select the roof style and settings, including an attic if wanted and available, then choose Done to create the spaces.
- 09
Review the house in 3D and Plan
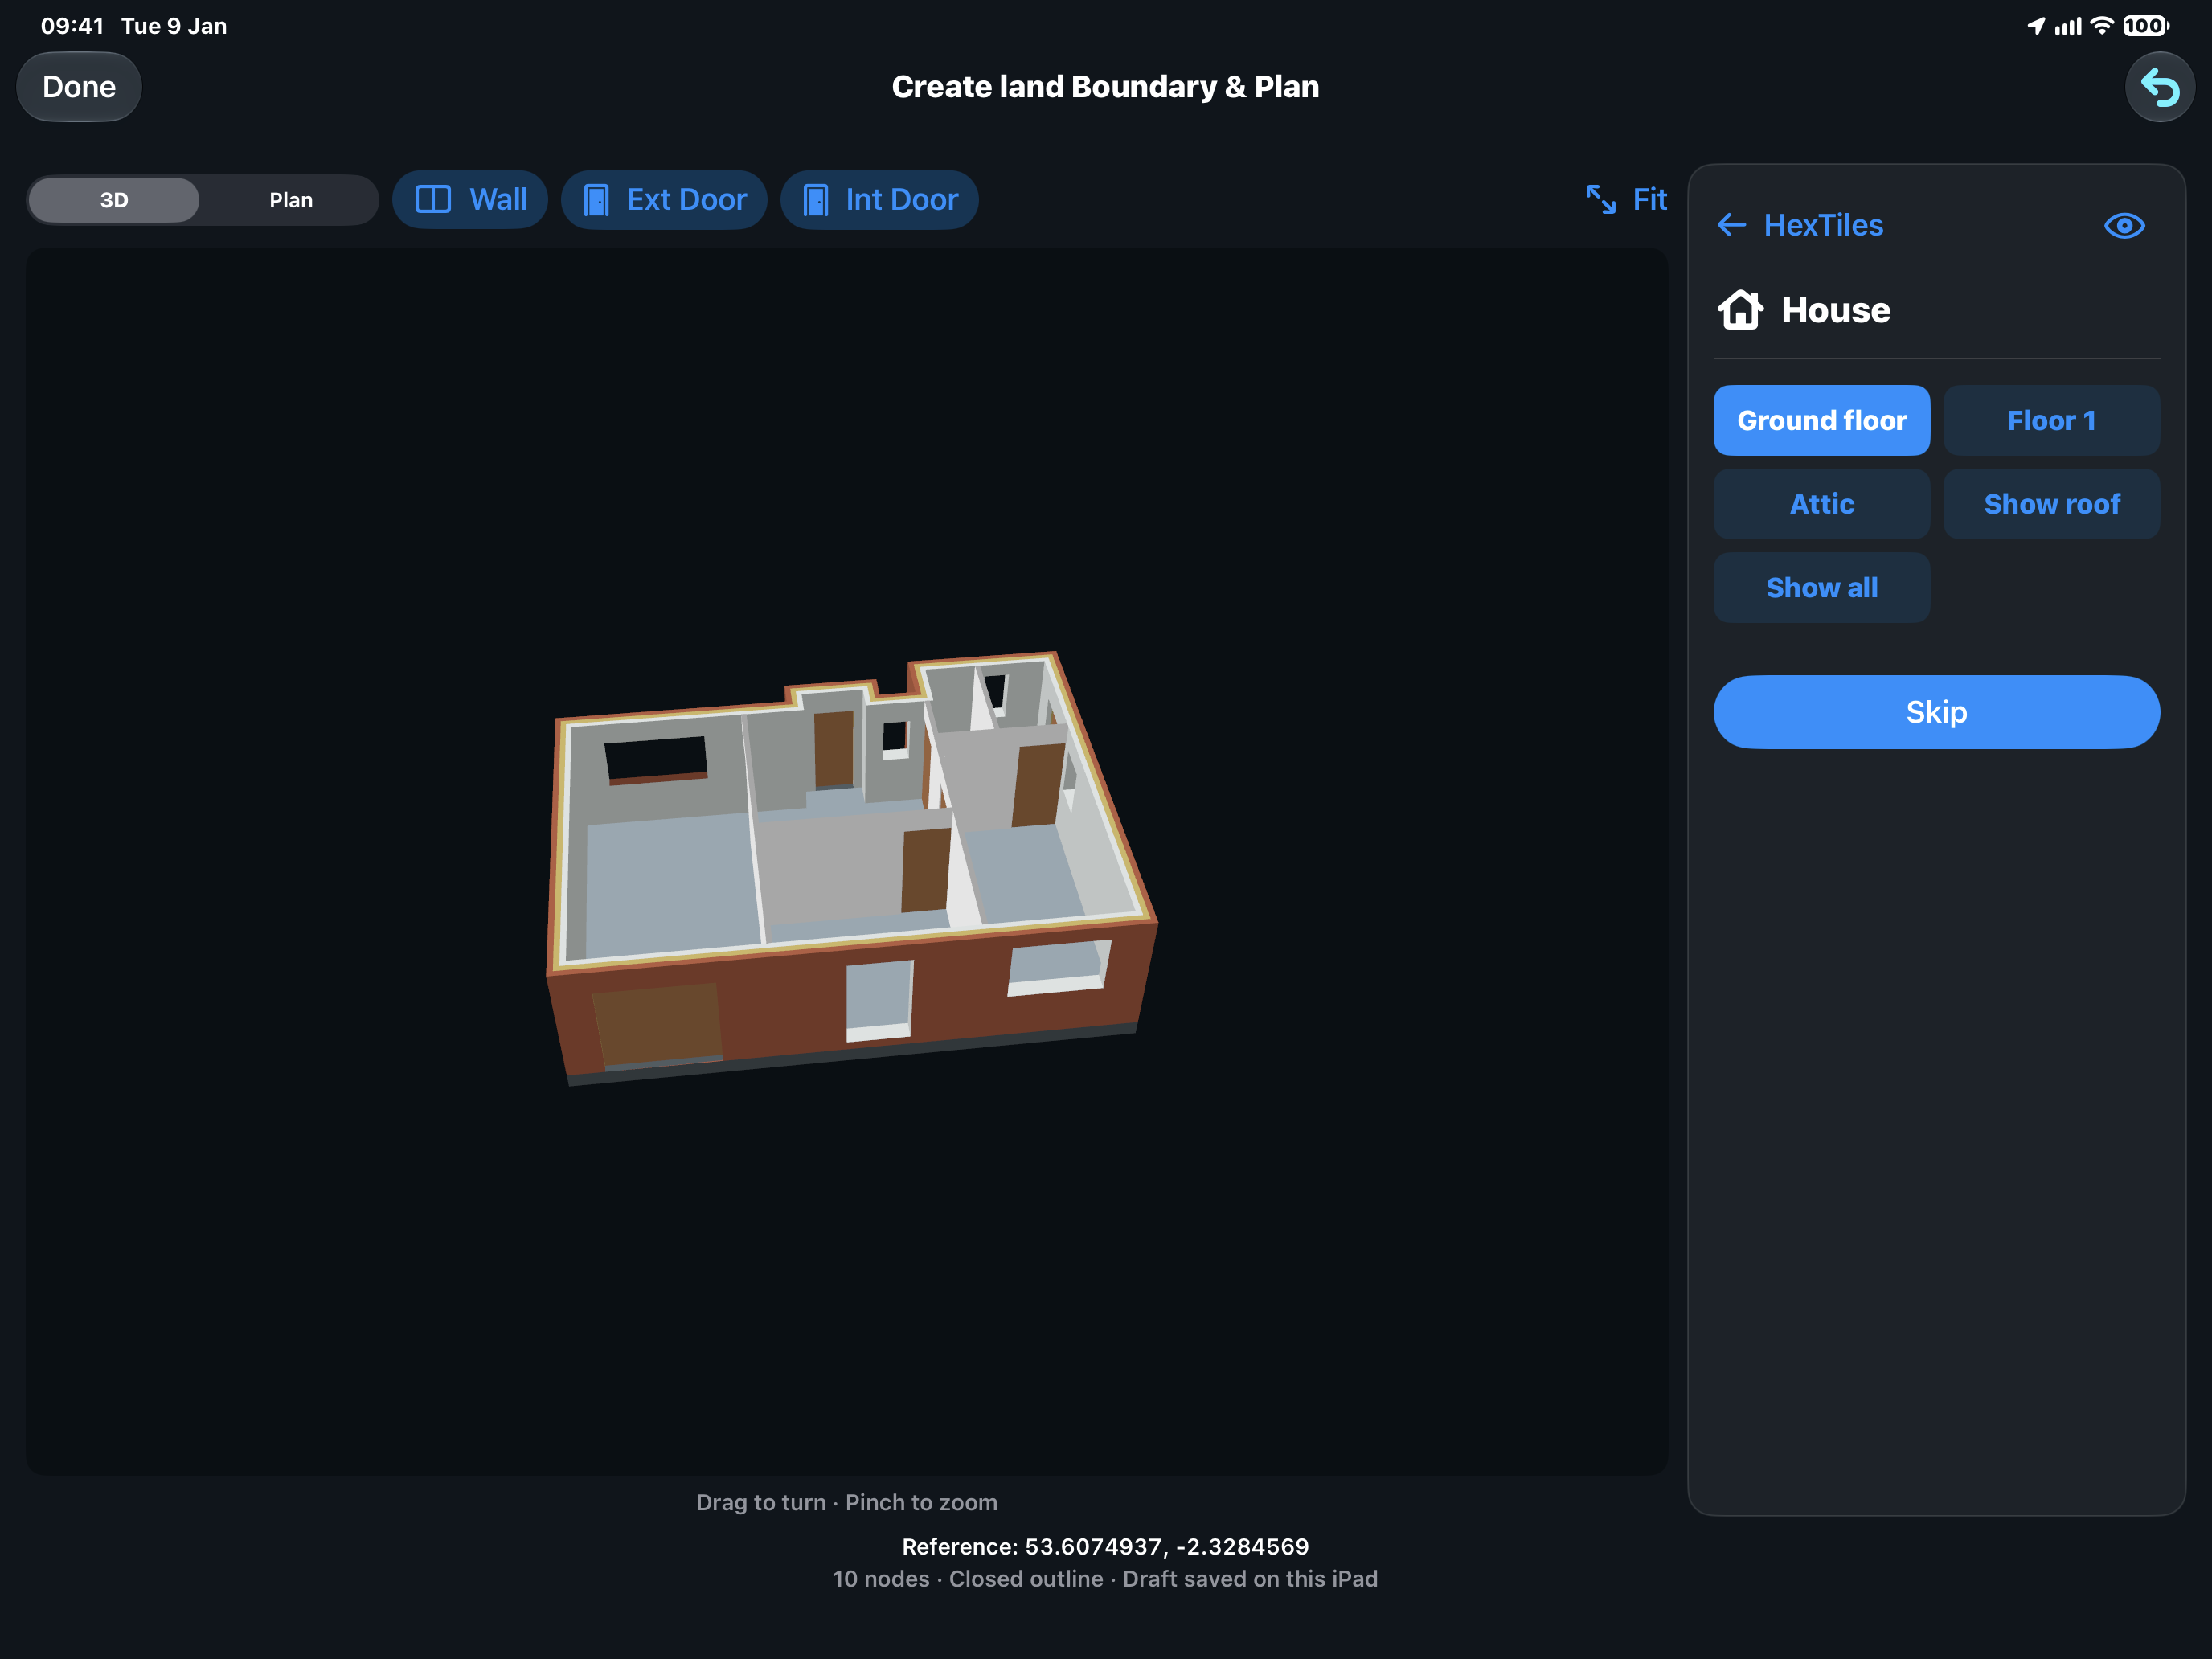
Use the floor buttons to inspect each level. Drag the 3D view to turn the house, pinch to zoom and use Fit to reset the framing. Show roof and Show all help you check the complete shell.
- 10
Add partitions and doors
Use Wall to divide a floor into rooms, Ext Door for a ground-floor outside entrance and Int Door for openings between rooms. Finish each editing tool with Done. Include a valid exterior door if you want to enter the house.
- 11
Choose when to publish
The editor saves draft changes on this iPad. When ready, tap Skip to reveal placement controls, then Place in HxAR Metaverse. Wait for the checks and Visible to everyone status. Later changes use Update shared building.
- 12
Visit the finished location
Close the editor with the top Done button, open the grouped property in Property Management and choose Visit Location. You can also use the globe or ship to reach the saved location. Check the outside and the entrance before adding more detail.
Start with House Plan on the dashboard
House Plan is a custom dashboard shortcut. Add it through an empty + slot if you have not already placed it on your dial, then tap it to open the House Plan screen.
How to Create is an animated demonstration of buying adjoining tiles, setting Property Land, grouping and drawing an outline. Use Back, Next, Pause or Replay to follow it at your own pace. Watching the demonstration does not buy land or change your saved plan.
My Groups Land Properties shows eligible groups owned by your signed-in account. Tap a card to create or continue its plan. The building icon at the top right opens Property Management, where you can organise the land first.
Prepare the land before drawing
Start with adjoining HexTiles that you actively own, and change each one to Property Land before grouping. The current group rules allow 2–100 tiles, joined edge to edge without an enclosed gap. The ten-tile example in How to Create is an example size, not a requirement.
In the Property Management List, choose Group, select the starting tile and its neighbours, enter a name and review the merge details. Hexagon Tokens buy HexTiles; merging owned tiles uses the HxElectrum amount shown by the app. Read the current quote and any credit before confirming.
House Plan lists complete, eligible Property Land groups, including groups with an existing house plan. Groups with missing members, inactive ownership or a different land use may remain in Property Management without appearing here. Refresh the property list and check every member if a group is missing.
The in-app demonstration includes leaving the grouping screen and opening Group again before selecting the tiles. Follow the screen prompts if the list needs to refresh, then return to House Plan once the group has been saved.
Draw the house inside the red boundary
Tap your group card to open Create land Boundary & Plan. The cyan HexTiles show the land in that group, and the red line marks its outer edge. It is the limit for this virtual plan, not a surveyed physical-property boundary.
Use Apple Pencil to tap the first corner inside the land. Drag from that point to create the first line, lift, then drag from its endpoint to add the next edge. Finger dragging pans the drawing; pinching changes the zoom. A finger tap is not the normal outline-point tool.
Lengths are shown in millimetres, with corner angles beside the nodes. Tap an editable label to enter a precise value. The editor checks that changes stay inside the grouped land and do not cross or collapse the outline.
To close the outline, bring the final line back to the first point and release when it snaps into place. Choose House in What are you creating? A simple rectangle is a useful first plan, but the example also shows a house with extra corners.
The closing edge and its locked angle labels cannot be adjusted directly. Use Undo to step back through your recent changes when you need to reopen the closure. Check the plan after each undo before drawing again.
Use a separate outline for each part of the site
A completed outline can be a House, Garage, Driveway, Garden or Pathway. The example has House, Garage, Driveway and Pathway labels because it contains separate closed outlines. You do not need to recreate that layout for your first house.
Tap a labelled outline to open its controls. Use the HexTiles back control to return to the whole site, then work on another outline. House and Garage have wall-building controls; the other types describe different parts of the plan.
Start with the House and leave enough room for its walls and entrance. This article follows the house workflow; drawing a driveway or garden label is not the same as publishing a house.
Create the shell: walls, floors and roof
In the House controls, review Wall thickness. The current wall layers use a 102.5 mm outer brick layer and a 100 mm inner block layer, with an adjustable 50–100 mm cavity. Choose Create after the wall preview fits the outline.
Ground floor height sets Floor to ceiling and Base below. Choose that section’s Done to advance. In Floors, adjust Floor / ceiling thickness, the number of Upper floors and the available floor heights, then choose Done again.
Roof offers Gable and Hipped styles, pitch adjustment and Rotate roof 90°. Gable can also offer Attic space and Main roof with cross-gables. The total is limited to ten spaces, counting the ground floor and any attic.
Choose the Roof section’s Done to create the building spaces. The section Done buttons move the design forward; the top-left Done closes the editor. Neither action publishes the house to other visitors.
Check each floor and add walls and doors
Switch between 3D and Plan to inspect the same building. In 3D, drag to turn and pinch to zoom. Fit resets the framing. Select Ground floor, an upper floor or Attic when present; use Show roof and Show all for the wider view.
After the spaces exist, Wall lets you place a partition near an existing wall, then move the partition or its endpoints and adjust the available measurements. Use Int Door to add a door to an internal partition.
Ext Door places an outside door on the ground floor. Tap the relevant wall, position the door and check its width and distances from the corners. Finish the tool with Done before rotating the view again.
Include a valid exterior door for interior entry. A house can have a visible outside without being ready to walk into. Review the entrance and room connections before publishing. The screenshot already contains partitions and doors; they are not all created automatically from the first outline.
Keep a draft or place the house in the shared world
Successful outline and building edits are saved as a draft on this iPad. Draft saved on this iPad describes local storage; it is not a promise that the editable draft is synced to another device. Read any Boundary Draft or save error before leaving.
After reviewing the floors, tap Skip to show the placement controls. Here Skip means finish the review stage. It does not delete the house or publish it.
Place in HxAR Metaverse is the action that shares the building at its saved location. It starts publication directly. Wait for Checking shared building… to finish and confirm Visible to everyone before treating the placement as complete.
Publication checks the completed geometry, your current ownership of every touched HexTile, suitable unlifted Property Land and conflicts with existing shared buildings. If it fails, follow the message and correct the land, ownership or geometry before trying again.
After publication, further draft changes need Update shared building to reach the shared world. Remove shared building asks for confirmation and removes the published building for everyone while retaining the local drawing.
Visit the house at its saved location
Use the top-left Done to leave the plan editor, then open the grouped property in Property Management and choose Visit Location. There is no separate Visit button in the draft editor.
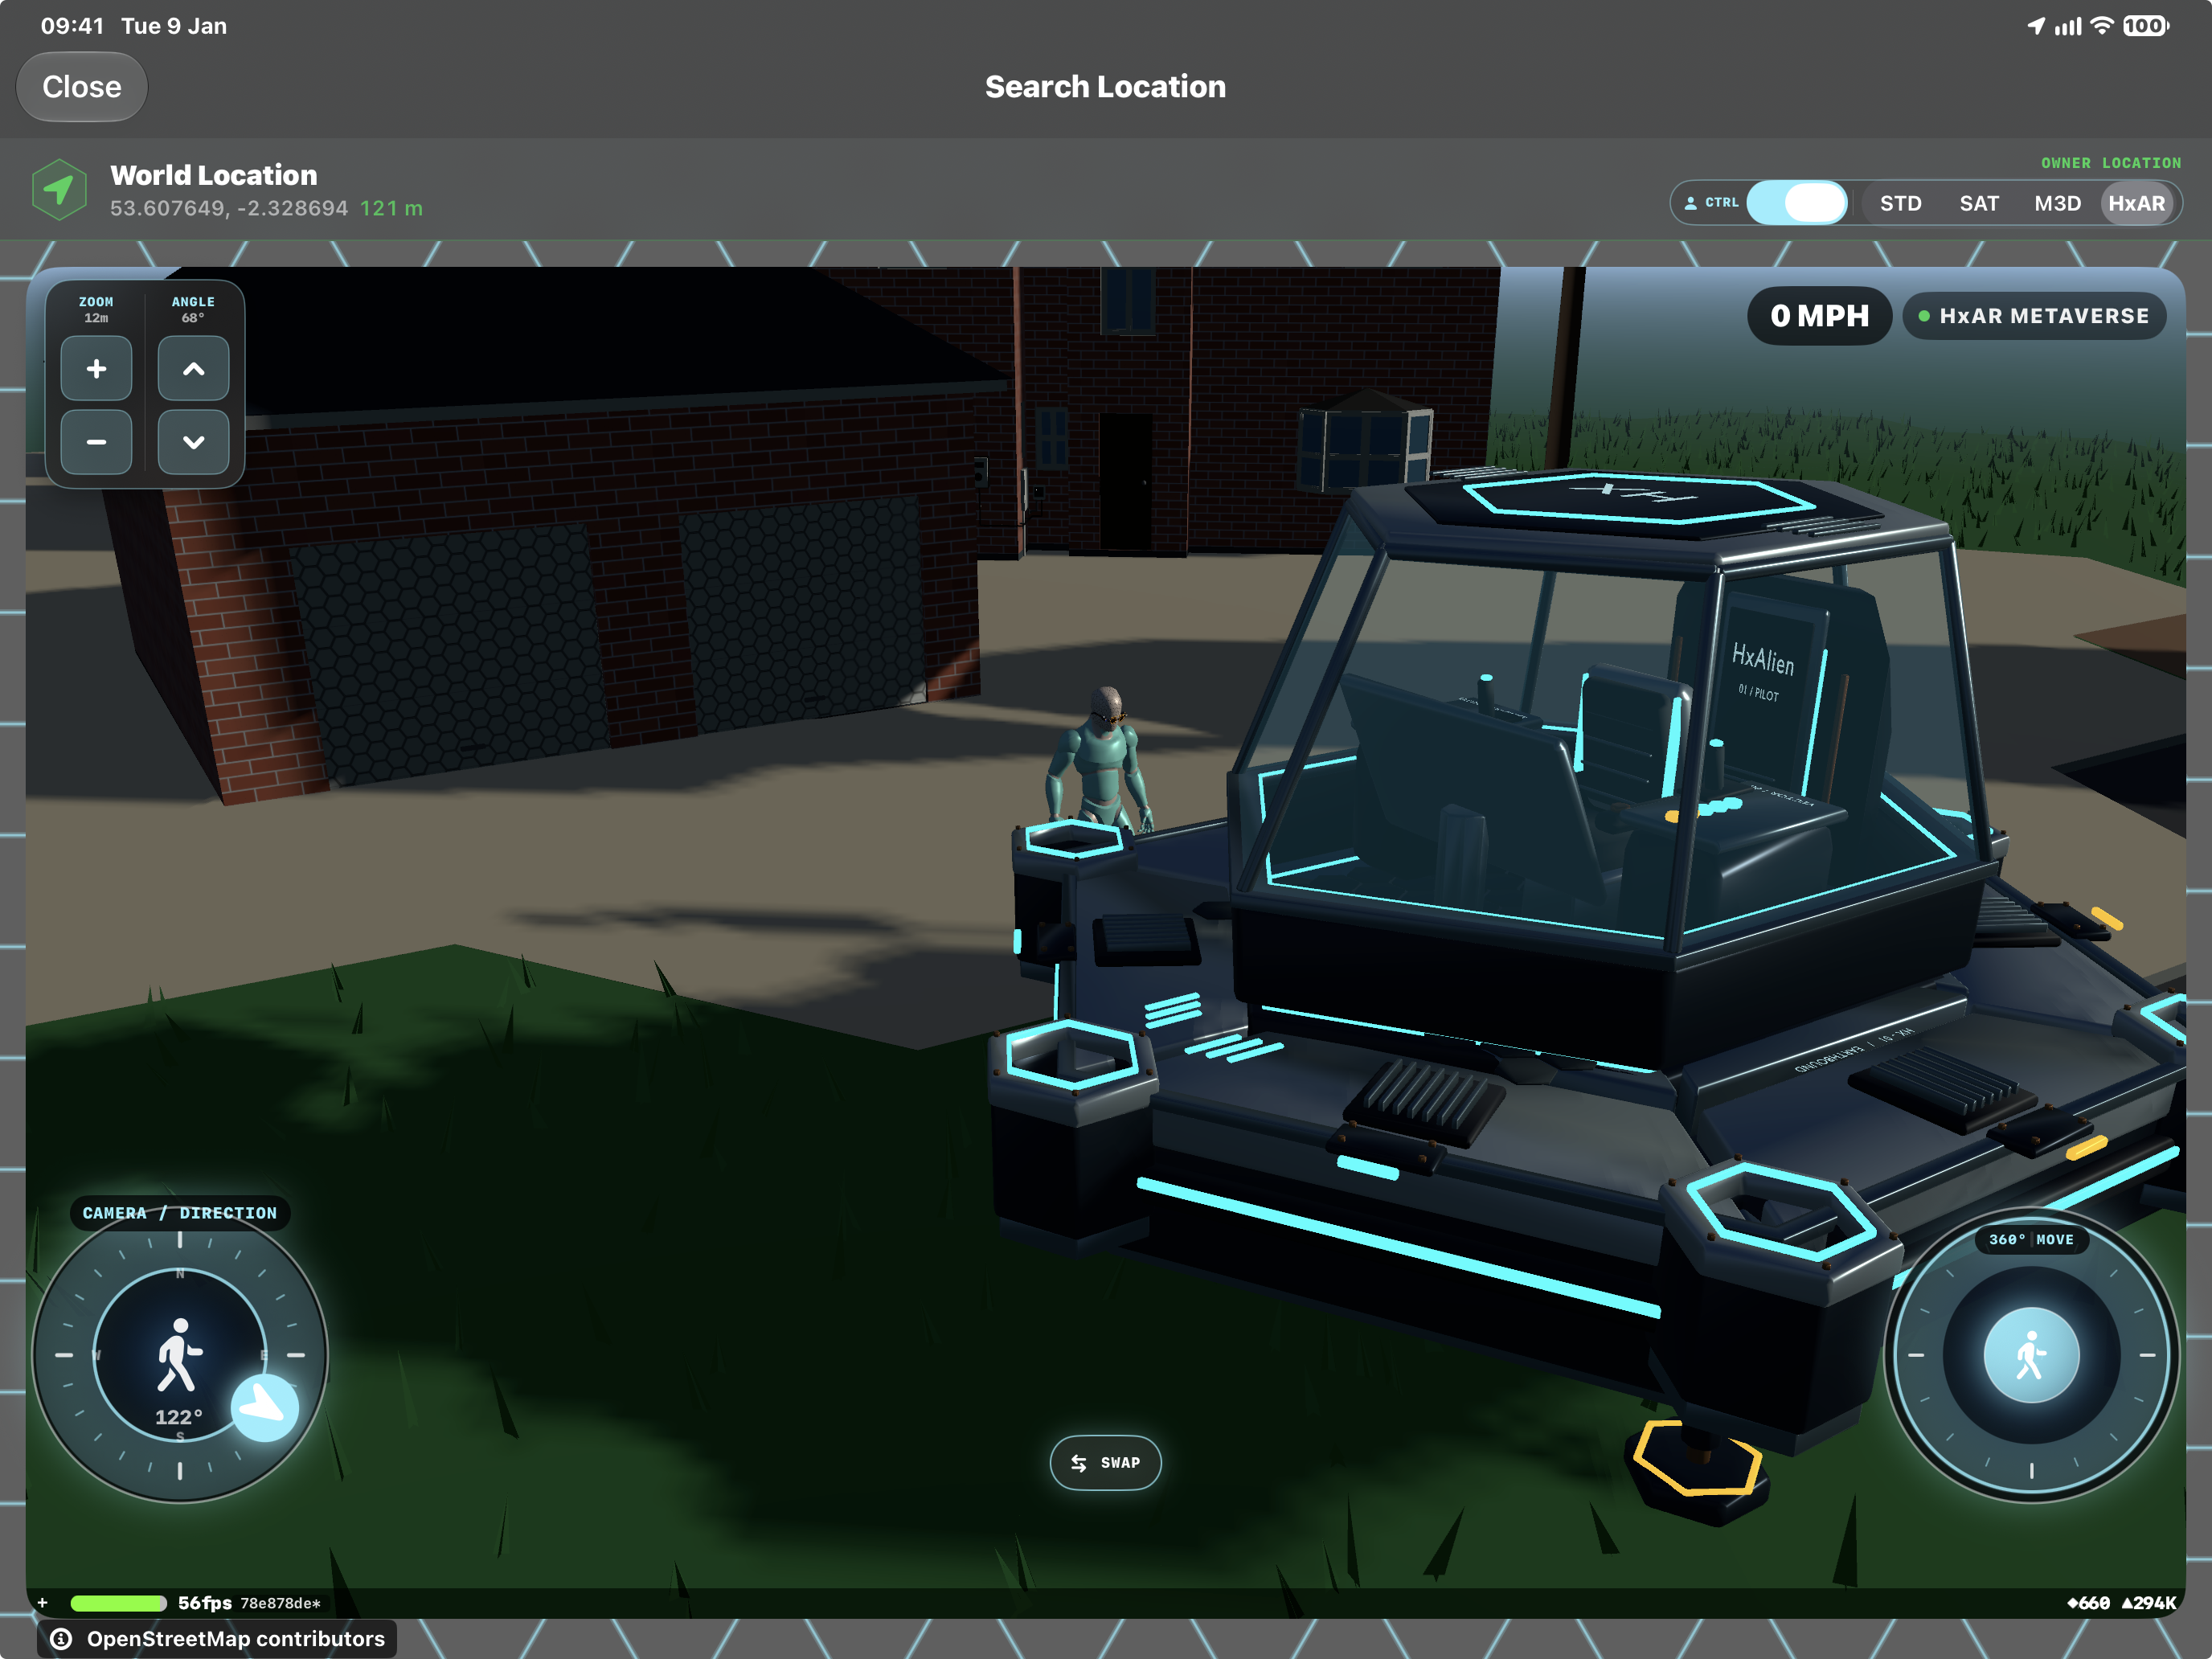
The dashboard globe and ship provide another route to the area. Select the saved location and wait for the local Metaverse to load. The ship in this example shows arrival beside a house; boarding or flying the ship does not publish your drawing.
Check the building’s position, exterior, entrance and room connections. If something needs changing, return to the group’s House Plan, edit the draft and use Update shared building when ready.
Continue with article 38 to enter the house, use the interior camera controls, explore connected rooms and add furnishings and finishes.
If a group, outline or placement is missing
No group card: check the signed-in account, active ownership, Property Land type and all group members in Property Management. Refresh and reopen House Plan. If Land Boundary Unavailable appears, return to Property Management so the complete group can load.
No new drawing point: use Apple Pencil on the HexTile canvas. Finger gestures move the view. Return from the focused House view to HexTiles before drawing another outline.
Walls do not fit: check the closed shape and wall cavity. A thin projection or narrow corner can leave too little space for the wall layers. Use the editor’s error message to correct the dimensions.
Cannot enter: add and position a valid ground-floor exterior door, finish the edit and update the shared building. A visible local draft or a finished 3D preview alone does not make a public, enterable house.
Guide path
Move through HxAR one topic at a time.
New topics will be linked back into earlier guides whenever one action leads naturally to another.
Helpful now